Overview
RecruitBook is a project created for CS2113T, Object Oriented Programming and Software Engineering, in the first semester of the second year of my undergraduate studies in the National University of Singapore. It was created with reference from SE-EDU’s AddressBook 4 in a group of 5 using GitHub as our collaboration medium.
The project involved turning the AddressBook application into RecruitBook, an application which aids Job Agents find suitable candidates for companies and vice versa. My role in this project was to develop the email feature.
Apart from simply developing the software, I have picked up many hard skills from working on this project such as using proper coding standards, using continuous integrations, writing tests, using JavaFX, and many software engineering principles such as the Law of Demeter and Brooks' Law.
I have also picked up soft skills while working with my team such as using the "I message" to get my points across without sounding rude, meeting skills to include everybody in the discussion so as to get everybody’s input to prevent future misunderstandings, and when conflicts arise, conflict resolution skills where I have to be careful in my choice of words so as to solve the conflict professionally, while mitigating damage where possible.
RecruitBook is a desktop application created for job agents. The user interacts with it using a command line interface, and it has a GUI created with JavaFX. It is written in Java, and has about 10,000 lines of code.
Summary of contributions
-
Major enhancement: Added an email feature
-
What it does: Allows the user to mass send emails about job offers to multiple candidates or about candidates to multiple companies regarding specified job offers.
-
Justification: It is imperative for a job agent to be able to inform candidates about job offers or inform companies about candidates. This feature allows emails to be sent quickly and automatically without any hassles.
-
Highlights: The email will be automatically generated, all the user needs to do is select the recipients and contents of the email. There is a preview feature built into the command to allow the user to double check the recipients and contents of the email. Subject text and body text of the email is also customisable.
-
-
Code contributed: [Functional code/Test Code]
-
Other contributions:
-
Project management:
-
Managed releases
v1.1-v1.4(4 releases) on GitHub
-
-
Enhancements to existing features:
-
Community:
-
PRs reviewed(non trivial) #79
-
-
Contributions to the User Guide
Below is my contributions to the User Guide. This demonstrates my ability to write documentation targeting end-users. |
Sending emails : email
Allows you to send an email to specified candidates about specified job offers OR
to specified companies about specified candidates that are suitable for specified job offers.
|
Only Gmail is supported at this point in time. If it is your first time running RecruitBook, a Gmail log in authorisation page will open on your browser. The Gmail account that you log in with will be the email account used to send emails. To use another Gmail account, delete tokens folder which is in the same directory of the
program.While the authorisation page is open, RecruitBook will be unresponsive while waiting for an authentication response. This also means that if RecruitBook never receives the authentication response, (by closing the authorisation page, or not having an internet connection), RecruitBook will remain to be unresponsive, and the only way out of this is by force closing it and reopening RecruitBook. This is part of Google’s API |
Format: email
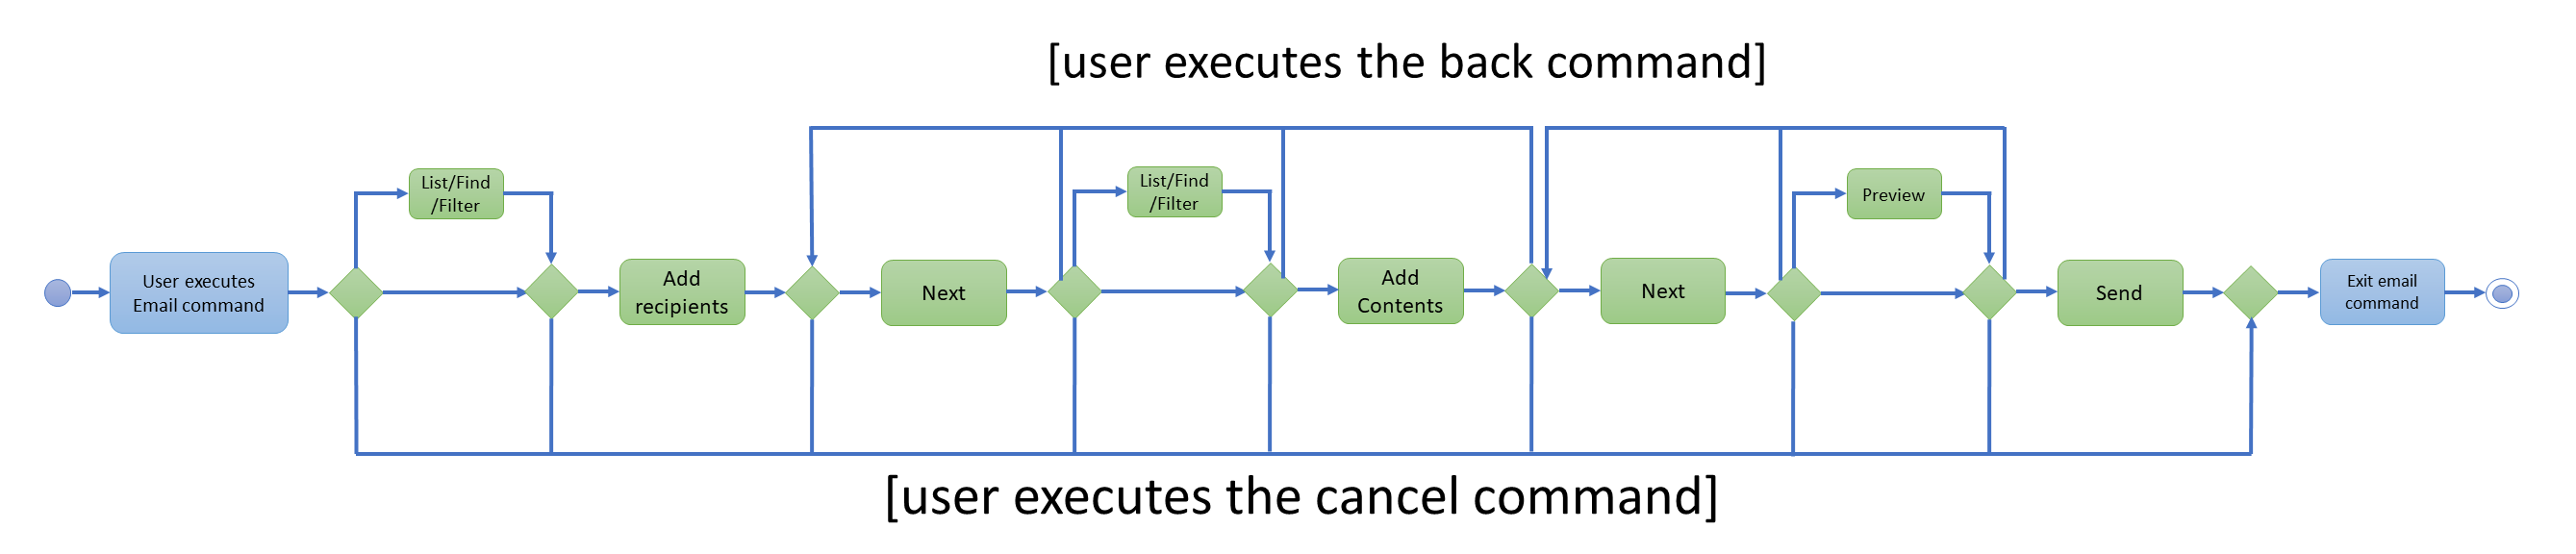
Email process is a 4-stage process. To exit from this process, enter cancel command as explained in [Exits from any intermediate command: cancel].
|
-
Initialisation. Type
emailand press Enter to initialise the email command. -
Choose your recipients. On the RecruitBook application, what is shown on the main window will be taken in as recipients.
-
You can use
switchto switch between candidates and company view. -
You can also use commands such as
listc,filtercandfindcto change the candidates shown. -
You can also use commands such as
listC,findC,findj,filterCandfilterjto change the job offers or companies shown. -
Type
addto add the recipients. You will be informed of what has been added, and theaddcommand can be used as many times as you want. -
Once done, you can type
nextand press Enter to move on to the next step.
-
-
Choose your contents.
-
Depending on what what the recipients are, contents must be contrasting.
eg. If you picked candidates as the recipients, you can only pick contents to be job offers and vice versa. -
This is enforced by limiting commands available in contents selection.
eg. If you have picked candidates as the recipients, you are restricted tolistC,findC,findj,filterCandfilterj.switchis now disabled by default as well. -
Type
addto add the contents. You will be informed of what has been added, and theaddcommand can be used as many times as you want. -
Once done, you can type
nextand press Enter to move on to the next step.
-
-
Sending your email. This step is a confirmation step before you send the email.
-
You can type
previewand press Enter to preview your email. A window will pop up showing the contents of the email. -
Type
sendand press Enter to send the email. There might be a slight lag while RecruitBook is sending the email(s)! Do not be alarmed.
-
Other notes
-
You can type in
backto go back to the previous step should you forget to add a certain recipient or content. -
Adding duplicate candidate/job offers will be caught and will not be double counted.
-
If recipients are candidates, candidate email addresses are sent under the BCC field to protect the privacy of your candidates.
-
If recipients are companies, emails are sent individually to each company.
You can also change the default email subject and email body text in preference.json.
Restart RecruitBook for changes to take effect.
-
subjectCandidateAsRecipient→ Email subject if recipients of the email are candidates and contents of the email are job offers -
subjectCompanyAsRecipient→ Email subject if recipients of the email are companies and contents of the email are candidates. -
bodyTextCandidateAsRecipient→ Body text of email if recipients of the email are candidates and contents of the email are job offers -
bodyTextCompanyAsRecipient→ Body text of email if recipients of the email are companies and contents of the email are candidates.
Examples:
-
email
(Initialise email command) -
findc s/$1000
(On CandidateBook) -
next
(To select recipients) -
findj j/Cashier
(On CompanyBook) -
next
(To select contents) -
preview
(To preview email) -
send
(To send the email)
Contributions to the Developer Guide
Below is my contribution to the Developer Guide. This demonstrates my ability to write technical documentation and the technical depth of my contributions to the project. |
Email command
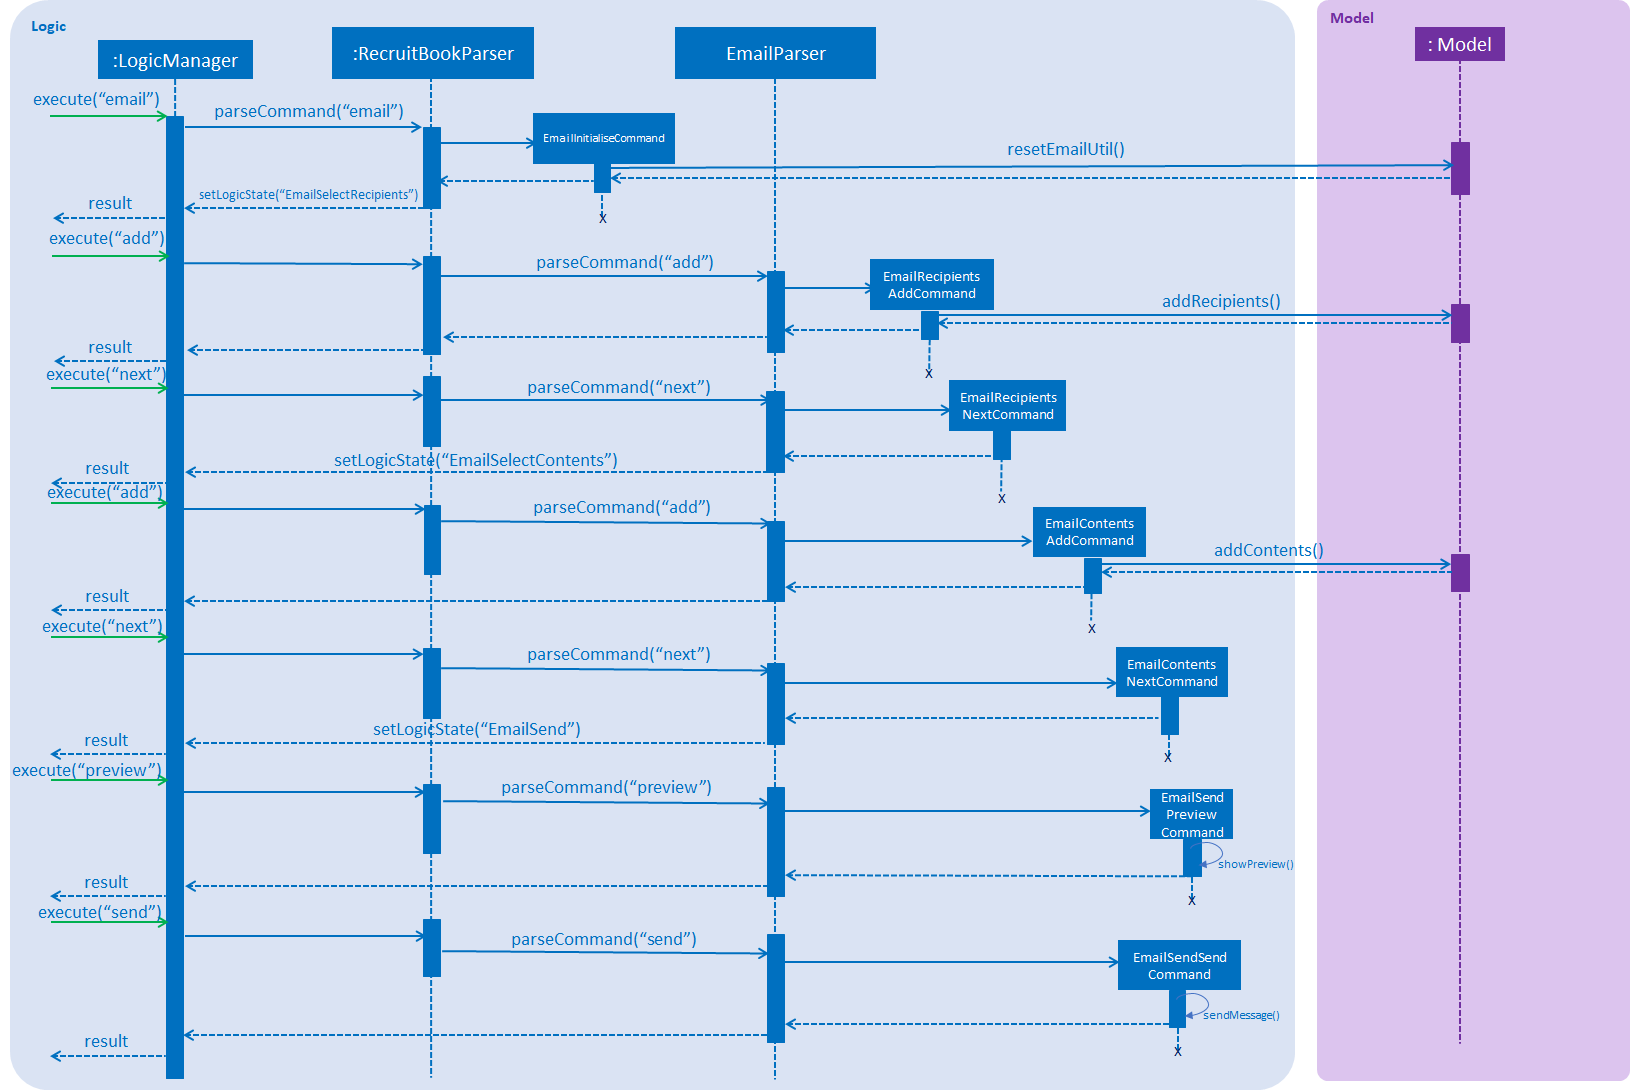
Current Implementation
The email command is facilitated by EmailInitialiseCommand, EmailRecipientsCommand, EmailContentsCommand and EmailSendCommand
classes which extends the Command class, and EmailUtil attribute in Model which stores variables and methods pertaining to the email command
and the EmailSettings class which stores email subject and email body text settings.
The email command is a 4-stage process supported by LogicManager by keeping track of the LogicState.
-
Initialisation, facilitated by
EmailInitialiseCommand. -
Choosing your recipients, facilitated by
EmailRecipientsCommand. Within which exists the following sub-stages:-
Adding recipients, facilitated by
EmailRecipientsAddCommand. -
Moving to the next step, facilitated by
EmailRecipientsNextCommand.
-
-
Choosing your contents, facilitated by
EmailContentsCommand. Within which exists the following sub-stages:-
Adding contents, facilitated by
EmailContentsAddCommand. -
Moving back to the previous step, facilitated by
EmailContentsBackCommand. -
Moving to the next step, facilitated by
EmailContentsNextCommand.
-
-
Sending your email, facilitated by
EmailSendCommand. Within which exists the following sub-stages:-
Moving back to the previous step, facilitated by
EmailSendBackCommand. -
Previewing your email, facilitated by
EmailSendPreviewCommand. -
Sending the email, facilitated by
EmailSendSendCommand.
-
As you can see, the email command is quite complicated, so in order to explain how it works, given below is an example usage scenario of how the email command behaves at each step.
-
You launch the application. The application loads email settings from
preferences.jsonwhich is stored inModel#EmailUtil. -
You execute the
emailcommand. A newEmailUtilobject is constructed and replaces theEmailUtilobject inModelusingmodel#resetEmailUtil.LogicStateis changed to reflect initialisation of the email command, moving theLogicStateto recipients selection state. -
You use
listc,findc,filterc,listC,findC,findj,filterCandfilterjto filter out who you wish to send the email to. -
You execute the
addcommand for the first time. This callsEmailRecipientsAddCommand.-
The add command first checks if there are recipients to add with
EmailRecipientsAddCommand#addCandidates or #addJobOffers. If there is nothing to add, an error message will be displayed. If there are objects to add, then the following steps will be executed. -
EmailUtil#hasRecipientsAddedboolean value is changed to true to indicate that there are recipients added. -
MainWindow#getCurrentBook()is called to return which book you are on andEmailUtil#areRecipientsCandidatesboolean value is changed accordingly:-
If recipients are candidates,
EmailUtil#areRecipientsCandidateswill be true. -
If recipients are companies,
EmailUtil#areRecipientsCandidateswill be false.
-
-
Depending on
EmailUtil#areRecipientsCandidates, the recipient objects are called withModel#getFilteredCandidateListorModel#getFilteredJobListand are stored in a linked hash set withinEmailUtilto prevent duplicates and to preserve insertion order.
Using theLinkedHashSet#add()boolean return value, it is possible to determine if object added is a duplicate. Duplicates are not added and are noted down inside anArrayListwithinEmailRecipientsAddCommandwhich will be reflected back to the user.
-
-
You then use
listc,findcandfiltercorlistC,findC,findj,filterCandfilterjto filter out more recipients. -
You execute another
addcommand to add more recipients. This callsEmailRecipientsAddCommand-
If
MainWindow#getCurrentBook()andEmailUtil#areRecipientsCandidatesdo not match, for example, ifMainWindow#getCurrentBook()returnscompanyBook, andemailUtil#areRecipientsCandidatesistrue, you will be notified with an error message because you have already added candidates as recipients, and you should not be allowed to add job offers. -
If
MainWindow#getCurrentBook()andEmailUtil#areRecipientsCandidatesmatch, recipients are added as per normal, as seen above. -
If there are duplicate recipients, RecruitBook will inform you about them and they will not be added.
-
-
You have added your recipients. So now you wish to move on to the next step, so you execute the
nextcommand. This callsEmailRecipientsNextCommandwhich based onEmailUtil#areRecipientsCandidates, which switches the current book and changesLogicStateto select contents phase.In EmailContentSelectionCommandphase, depending onEmailUtil#areRecipientsCandidates, the book displayed will be locked and only commands pertaining to the current book can be used. This is to enforce that recipients and contents are either candidates and job offers or job offers and candidates. -
You use
listc,findcandfiltercorlistC,findC,findj,filterCandfilterjto filter out the contents of the email. -
You then execute the
addcommand. This callsEmailContentsAddCommandwhich adds contents in the same manner asEmailRecipientsAddCommandas seen above. Having no contents to be added and duplicates will be caught and reflected back to you in the form of an error. -
You execute
nextcommand to move on to the confirmation step. This callsEmailContentsNextCommandwhich changesLogicStateto the send phase. -
In order to double check if you have picked the correct recipients and contents, you execute the
previewcommand. This callsEmailSendPreviewCommand.-
This generates a string of the email based on recipients and contents in
EmailUtilwhich callsEventCenterto postShowEmailPreviewEventwith the email String and shows the string in a new window,EmailPreview. -
The string is generated differently, depending if your recipients are candidates or companies.
-
If your recipients are candidates, then the
Tofield of the email will contain all the recipients. -
If your recipients are job offers, then the job offers are paired with its company, and each company will have its own
Tofield, to show that an email will be sent individually to each company.
For example, if I am sending an email toAppleregarding a job offer onCashierandCleaner, andDBSregarding a job offer onCafe Waiter, there will be 2Tofields that look like this:-
To: Apple(apple@example.com) regarding job offers: [Cashier, Cleaner] -
To: DBS(dbs@example.com) regarding job offer: [Cafe Waiter]
-
-
-
-
You are satisfied with the preview and execute the
sendcommand to send the email. This generates the email as aMimeMessagewhich is the Java format used for emails and is sent viaEmailUtil#sendMessage.-
If recipients are candidates, one email will be sent to all candidates with their emails sent under the
BCCfield to prevent recipients from seeing each other’s emails, which preserves privacy of the candidates. -
If recipients are companies, one email will be sent per company detailing the specific job offer(s) that you have added during the selection of recipients.
-
-
LogicStateis then reset back to original and this marks the end of the email command.
This is the simplified action diagram and sequence diagram when one executes the email command, assuming that the add command is used once per selectRecipients and selectContents step.
Design Considerations
Aspect: Data structure to store recipients and contents
-
Alternative 1: Array List
-
Pros: General purpose data structure that will work for this use case
-
Cons: Checking for duplicates is not efficient. Each insertion requires a comparison across all elements in the array.
-
-
Alternative 2: Hash Set
-
Pros: Does not allow duplicates and indicates if an object being added is successful or not.
-
Cons: Does not maintain the order in which objects were added in.
-
-
Alternative 3 (current choice): Linked Hash Set
-
Pros: Does not allow duplicates, indicates if an object being added is successful or not, and maintains order in which objects were added in.
-
Cons: Not as fast as a hash set, but speed can be sacrificed for the benefits.
-
Aspect: The design choice of the Email command
-
Alternative 1: Having a pop up Email window with editable fields
-
Pros: More customisable, more intuitive and looks better
-
Cons: Very labour intensive to email many people. Adding candidates manually will take a very long time, even if the GUI can be used to assist.
-
-
Alternative 2 (current choice): Using command line to mass add recipients and contents
-
Pros: Very suitable for mass sending applications, which was the main design consideration when designing the email command.
-
Cons: Not very customisable, but we will try to add more customisability down the road.
-
Overview
PartyCards was a project created for CP2106, Independent Software Development Project (Orbital), during the summer after my first year in the National University of Singapore. The project was created from scratch in a group of 2, using GitHub as our collaboration medium.
PartyCards was written with ReactJS frontend and Node.js backend. Being forced to write this web application from scratch gave me many insights into the world of website creation, from creating the back-end server to the front-end design of the website. I also learnt how to use the ReactJS javascript framework and use NodeJS effectively as the back end for the website, which is the preferred choice of frameworks to use for website-building nowadays.
PartyCards is a web application that allows up to 4 users play card games. Card games include: Cheat, Taiti, Bridge and Hearts.
Summary of contributions
-
Major enhancement: Added game: Cheat
-
What it does: Allows up to 4 users to connect and play the game: Cheat.
-
Highlights: I wrote the logic of the game, from how the front end checks if a card being played is valid to how the back end handles if somebody is being accused as cheating.
-
-
Major enhancement: Added game: Taiti
-
What it does: Allows up to 4 users to connect and play the game: Taiti.
-
Highlights: I wrote the logic of the game, from how the front end checks if a card combination being played is valid to how back end handles each turn and updates the current deck.
-
-
Major enhancement: Reconnection feature
-
What it does: Allows users to disconnect from the game instance and rejoin the game instance,
-
Justification: Users should be allowed to reconnect to a game should they disconnect due to bad internet connection.
-
Highlight: When the user reconnects, all cards the user had will be reinstated, allowing the user to pick up where he/she left off.
-
-
Major enhancement: Added mobile support to PartyCards
-
What it does: Allows users to play PartyCards comfortably on a mobile screen.
-
Justification: Websites should always support mobile(portrait) and desktop(landscape) orientations. This will make the web-application playable on all platforms.
-
-
Other contributions:
-
Project management:
-
Managed releases
Milestone 1-Milestone 3(3 releases) on GitHub
-
-
Documentation:
-
Updated README.md with documentation on PartyCards
-
-
Tools:
-
Integrated Socket.io into the project to handle easy client to client communication
-
-