By: Team F09-4 Since: Sept 2018 Licence: MIT
Welcome to RecruitBook!
RecruitBook is an offline desktop application that allows you to manage job candidates and job offers throughout the process of recruiting. Designed specifically to ease the recruitment process, you can use RecruitBook to add, edit, find, filter, shortlist, email and delete candidates, as well as job offers, to help you efficiently link potential candidates to the job offer that is best suited for them. Hence, you can organise and sift out your desired information with just a few clicks due to the meticulous data handling in RecruitBook.
RecruitBook is written in Java, and you can interact with it using Command-Line Interface(CLI), as well as Graphical User Interface(GUI). Its GUI is created with JavaFX.
This guide provides information that will not only help you get started as a RecruitBook contributor, but also get a better understanding of data handling and code implementation if you are interested in coding.
We welcome feedback and queries, and you can contact us at cs2113.f09.4@gmail.com.
1. Getting Started
Follow the simple list below to get RecruitBook up and running with Java.
1.1. Prerequisites
If you have Java 9 and IntelliJ set up, you may skip to 1.2.
-
Install JDK
9or laterYou may download it here.
JDK 10on Windows will fail to run tests in headless mode due to a JavaFX bug. Windows developers are highly recommended to use JDK9. -
Install IntelliJ IDE
You may download it here.
IntelliJ by default has Gradle and JavaFx plugins installed.
Do not disable them. If you have disabled them, go toFile>Settings>Pluginsto re-enable them.
1.2. Setting up the project in your computer
-
Fork this repo, and clone the fork to your computer
-
Open IntelliJ (if you are not in the welcome screen, click
File>Close Projectto close the existing project dialog first) -
Set up the correct JDK version for Gradle
-
Click
Configure>Project Defaults>Project Structure -
Click
New…and find the directory of the JDK
-
-
Click
Import Project -
Locate the
build.gradlefile and select it. ClickOK -
Click
Open as Project -
Click
OKto accept the default settings -
Open a console and run the command
gradlew processResources(Mac/Linux:./gradlew processResources). It should finish with theBUILD SUCCESSFULmessage.
This will generate all resources required by the application and tests.
1.3. Verifying the setup
-
Run
seedu.recruit.MainAppand try a few commands -
Run the tests to ensure they all pass.
2. Design
2.1. Architecture
The Architecture Diagram given above explains the high-level design of the App. Given below is a quick overview of each component.
The .pptx files used to create diagrams in this document can be found in the diagrams folder. To update a diagram, modify the diagram in the pptx file, select the objects of the diagram, and choose Save as picture.
|
Main has only one class called MainApp. It is responsible for,
-
At app launch: Initializes the components in the correct sequence, and connects them up with each other.
-
At shut down: Shuts down the components and invokes cleanup method where necessary.
Commons represents a collection of classes used by multiple other components. Two of those classes play important roles at the architecture level.
-
EventsCenter: This class (written using Google’s Event Bus library) is used by components to communicate with other components using events (i.e. a form of Event Driven design) -
LogsCenter: Used by many classes to write log messages to the App’s log file.
The rest of the App consists of four components.
Each of the four components
-
Defines its API in an
interfacewith the same name as the Component. -
Exposes its functionality using a
{Component Name}Managerclass.
For example, the Logic component in Figure 2 defines it’s API in the Logic.java interface and exposes its functionality using the LogicManager.java class.
Events-Driven nature of the design
The Sequence Diagram in Figure 3 shows how the components interact for the scenario where the user issues the command delete 1.
deleteC 1 command (part 1)
Note how the Model simply raises a CompanyBookChangedEvent when the data in the CompanyBook is changed, instead of asking the Storage to save the updates to the hard disk.
|
The diagram in Figure 4 shows how the EventsCenter reacts to that event, which eventually results in the updates being saved to the hard disk and the status bar of the UI being updated to reflect the 'Last Updated' time.
deleteC 1 command (part 2)
Note how the event is propagated through the EventsCenter to the Storage and UI without Model having to be coupled to either of them. This is an example of how this Event Driven approach helps us reduce direct coupling between components.
|
The sections below give more details of each component.
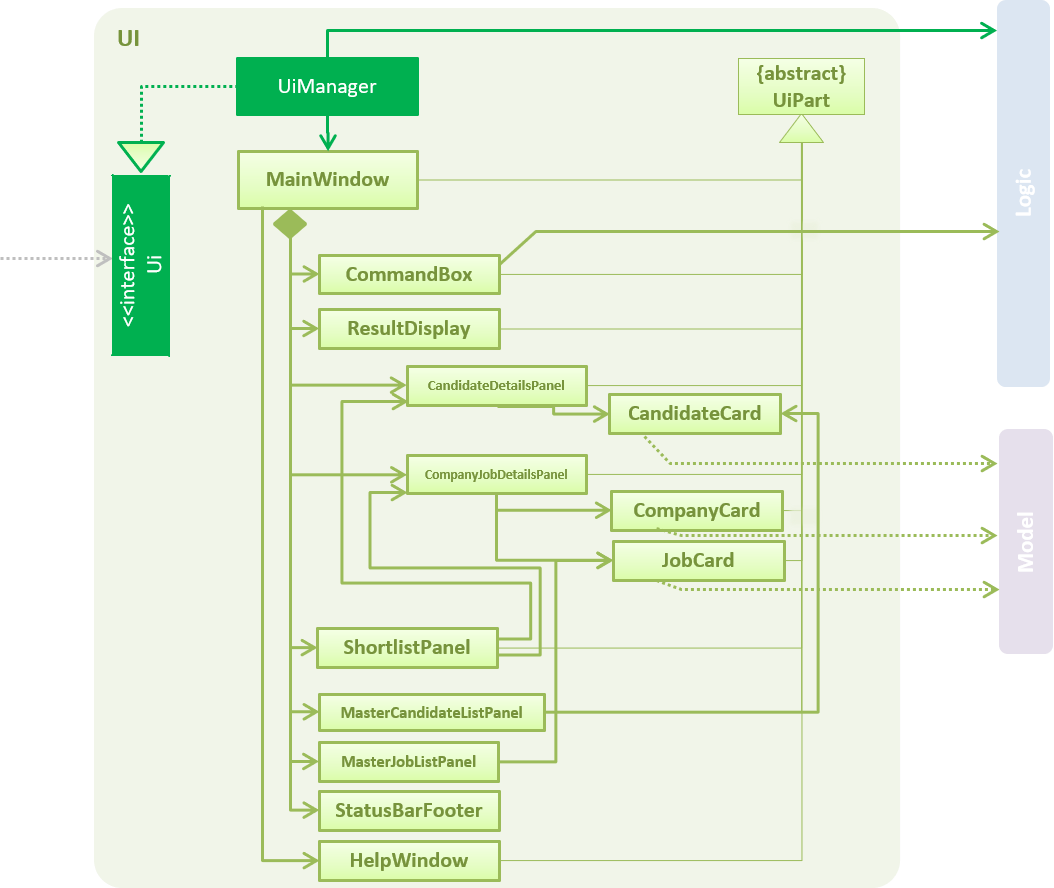
2.2. UI component
API : Ui.java
As illustrated in Figure 5, the UI consists of a MainWindow that is made up of parts
e.g.CommandBox, ResultDisplay, CandidateDetailsPanel, CompanyJobDetailsPanel,
ShortlistPanel, MasterCandidateListPanel, MasterJobListPanel, StatusBarFooter. All these, including the MainWindow, inherit from the abstract UiPart class.
There are 5 placeholders inside MainWindow that fills the screen along with the menu bar.
Placeholder |
Parts of |
commandBoxPlaceholder |
|
resultDisplayPlaceholder |
|
panelViewPlaceholder |
|
masterListPlaceholder |
|
statusbarPlaceholder |
|
In Company Book, panelViewPlaceholder holds CompanyJobDetailsPanel and masterListPlaceholder
holds MasterJobListPanel, while in Candidate Book, panelViewPlaceholder holds CandidateDetailsPanel
and masterListPlaceholder holds MasterCandidateListPanel.
The UI component uses JavaFx UI framework. The layout of these UI parts are defined in matching .fxml files that are in the src/main/resources/view folder. For example, the layout of the MainWindow is specified in MainWindow.fxml
The UI component,
-
Executes user commands using the
Logiccomponent. -
Binds itself to some data in the
Modelso that the UI can auto-update when data in theModelchange. -
Responds to events raised from various parts of the App and updates the UI accordingly.
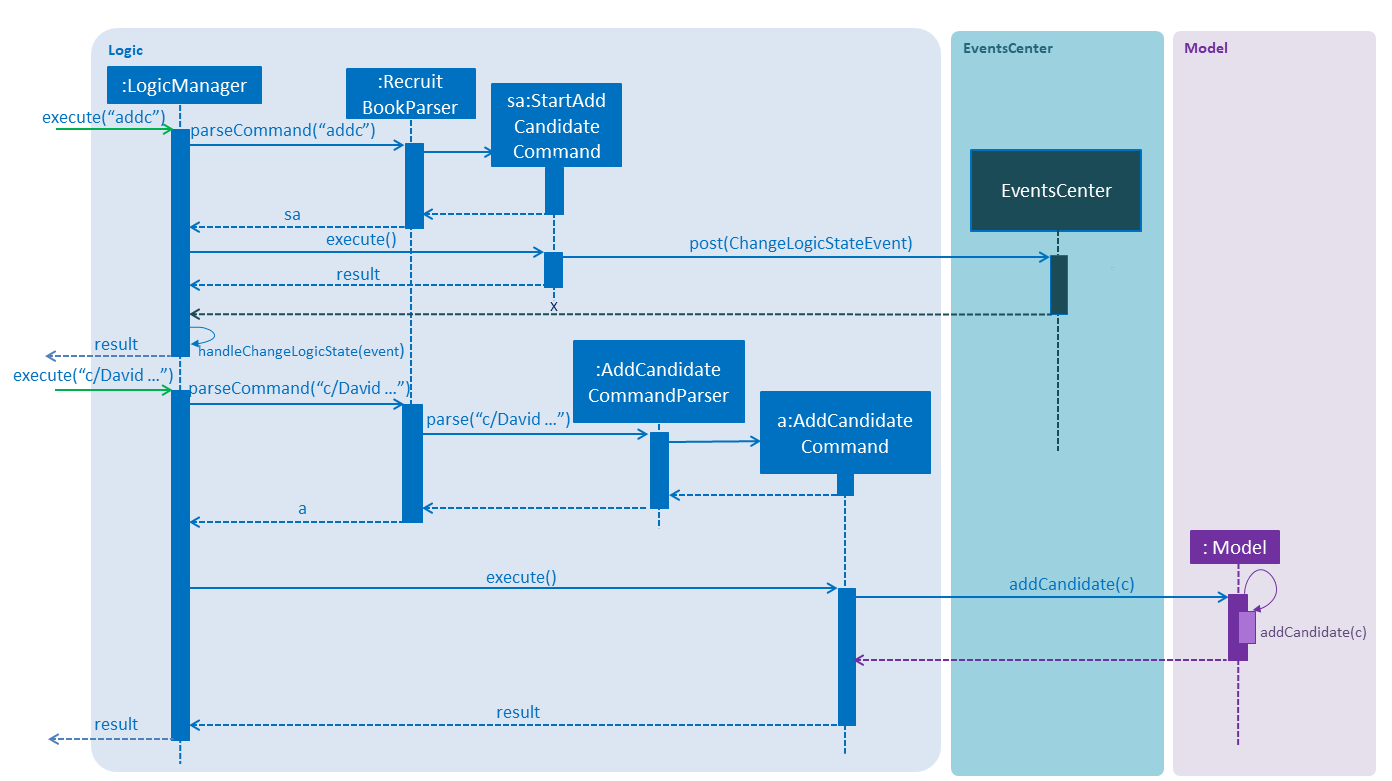
2.3. Logic component
API :
Logic.java
As illustrated in Figure 6,
-
Logicuses theRecruitBookParserclass to parse the user command. -
This results in a
Commandobject which is executed by theLogicManager. -
The command execution can affect the
Model(e.g. adding a candidate) and/or raise events. -
The command execution can also affect the LogicState of the LogicManager (e.g. StartAddCandidateCommand, ShortlistCandidateCommand) and raises a ChangeLogicStateEvent.
-
The result of the command execution is encapsulated as a
CommandResultobject which is passed back to theUi.
Given below in Figure 7 is the Sequence Diagram for interactions within the Logic component for the execute("deletec 1") API call.

deletec 1 Command2.4. Model component
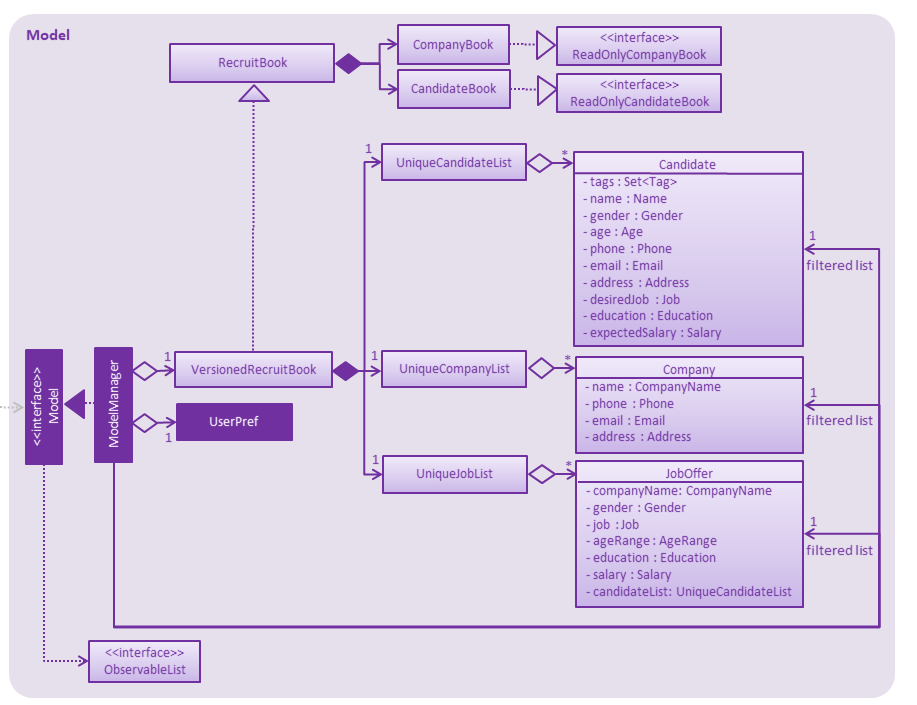
API : Model.java
The Model,
-
stores a
UserPrefobject that represents the user’s preferences. -
stores the RecruitBook data in
VersionedRecruitBook. -
exposes an unmodifiable lists
ObservableList<Candidate>,ObservableList<JobOffer>,ObservableList<Company>that can be 'observed' e.g. the UI can be bound to this list so that the UI automatically updates when the data in the list change. -
does not depend on any of the other three components.
2.5. Storage component
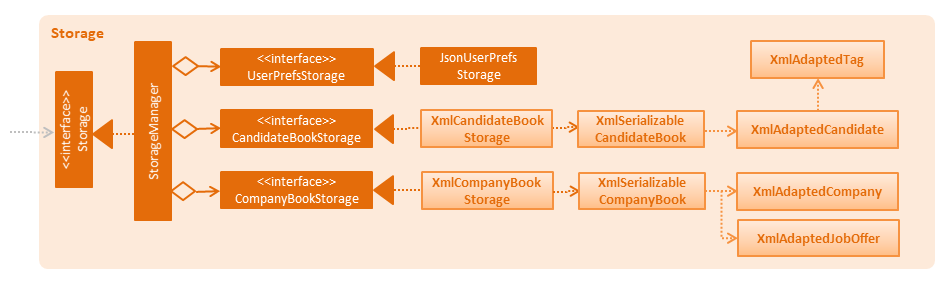
API : Storage.java
The Storage component,
-
can save
UserPrefobjects in json format and read it back. -
can save all of RecruitBook data in xml format and read it back.
2.6. Common classes
Classes used by multiple components are in the seedu.recruit.commons package.
3. Implementation
This section describes some noteworthy details on how certain features are implemented.
3.1. Add/Delete Feature
3.1.1. Current Implementation
Candidates
The add/delete mechanism of candidates is facilitated in UniqueCandidateList which stores the added candidates internally as an internalList which is a list of Candidate objects.
It implements Iterable<Candidate>, where it overrides the Iterator, equals and hashCode of the Iterable interface.
Additionally, it implements the following operations to support adding/deletion of candidates:
-
UniqueCandidateList#contains(Candidate candidate)— Checks whether a candidate exists insideinternalListusingCandidate#isSameCandidateto define equality. -
UniqueCandidateList#add(Candidate candidate)— Adds a unique candidate tointernalList. Checks for uniqueness usingUniqueCandidateList#contains(Candidate candidate). -
UniqueCandidateList#remove(Candidate candidate)— Removes the equivalent candidate frominternalList.
These operations are exposed in the Model interface as Model#addCandidate(Candidate) and Model#deleteCandidate(Candidate candidate) respectively.
Companies
The add/delete mechanism of companies is facilitated in UniqueCompanyList which stores the added companies internally as an internalList which is a list of Company objects.
It implements Iterable<Company>, where it overrides the Iterator, equals and hashCode of the Iterable interface.
Additionally, it implements the following operations to support adding/deletion of companies:
-
UniqueCompanyList#contains(Company company)— Checks whether a company exists insideinternalListusingCompany#isSameCompanyto define equality. -
UniqueCompanyList#add(Company company)— Adds a unique company tointernalList. Checks for uniqueness usingUniqueCompanyList#contains(Company company). -
UniqueCompanyList#remove(Company company)— Removes the equivalent company frominternalList.
These operations are exposed in the Model interface as Model#addCompany(Company) and Model#deleteCompany(Company company) respectively.
Job Offers
The add/delete mechanism of job offer is facilitated in UniqueJobList which stores the added job offer internally as an internalList which is a list of JobOffer objects.
It implements Iterable<JobOffer>, where it overrides the Iterator, equals and hashCode of the Iterable interface.
Additionally, it implements the following operations to support adding/deletion of job offer:
-
UniqueJobList#contains(JobOffer jobOffer)— Checks whether a job offer exists insideinternalListusingJobOffer#isSameJobOfferto define equality. -
UniqueJobList#add(JobOffer jobOffer)— Adds a unique job offer tointernalList. Checks for uniqueness usingUniqueJobOfferList#contains(JobOffer jobOffer). -
UniqueJobList#remove(JobOffer jobOffer)— Removes the equivalent job offer frominternalList.
These operations are exposed in the Model interface as Model#addJobOffer(JobOffer) and Model#deleteJobOffer(JobOffer jobOffer) respectively.
| All addition/deletion of the 3 entities (Candidates, Companies, Job Offers) follow the same mechanism. |
Given below is an example usage scenario for adding/deleting of these entities and how the adding/deleting mechanism behaves at each step.
Step 1. The user launches the application for the first time.
-
UniqueCandidateListwill be initialised with the list of saved candidates in RecruitBook -
UniqueCompanyListwill be initialised with the list of saved companies in RecruitBook -
UniqueJobListwill be initialised with the list of saved job offers.
Step 2. The user executes …
-
addcto start the Add Candidate Interface -
addCto start the Add Company Interface -
addjto start the Add Job Interface
Step 2. The user executes …
-
n/John Doe g/M …to add a new candidate.AddCandidateCommandcallsModel#hasCandidate(Candidate candidate)to check if a duplicate entry exists. ThenModel#addCandidate(Candidate candidate)and adds the candidate to the CandidateBook. -
c/McDonalds a/101, Teban Gardens, #01-01 …to add a new company.AddCompanyCommandcallsModel#hasCompany(Company company)to check if a duplicate entry exists. ThenModel#addCompany(Company company)and adds the company to the CompanyBook. -
c/McDonalds j/Cashier …to add a new job offer.AddJobDetailsCommandcallsModel#hasJobOffer(JobOffer jobOffer)to check if a duplicate entry exists. ThenModel#addJobOffer(JobOffer jobOffer)and adds the job offer to the CompanyBook.
Step 4. The user executes …
-
deletec 1,3-4to delete multiple candidates.DeleteCandidateCommandcallsModel#removeCandidate(Candidate candidate)for the candidates listed at index 1, and 4. -
deleteC 1,3-4to delete multiple companies.DeleteCompanyCommandcallsModel#removeCompany(Company company)for the companies listed at index 1, and 4. -
deletej 1,3-4to delete multiple job offers.DeleteJobOfferCommandcallsModel#deleteJobOffer(JobOffer jobOffer)for the job offers listed at index 1, and 4.
Below in Figure 9. is a sequence diagram of how adding a candidate works in RecruitBook and also serves to depict the adding mechanism for job offers and companies due to their similarity.
3.1.2. Design Considerations
Aspect: How add/delete feature executes
-
Alternative 1 (current choice): Start an adding interface. Users can continually add entries for the same object until they enter 'cancel'
-
Pros: User can keep adding multiple entries of the same object without having to entering the
addc,addCor `addj. -
Cons: Not very convenient for user if he/she just needs to add one entry.
-
-
Alternative 2: Enter command_word and argument
-
Pros: Adding entries of specific objects is straightforward. Enter the respective command word and the respective details
-
Cons: Entering the command word becomes a hassle when adding a large number of entries ===== Aspect: Data structure to support the add/delete feature
-
-
Alternative 1 (current choice): Create a new list object to store objects e.g.
UniqueCompanyList-
Pros: Easy to implement, allows for manipulation of data within the data structure (e.g) sorting. Also allows us to define a stricter form duplicity between objects.
-
Cons: Storing objects in a list makes certain operations O(n) e.g. delete operation searches the whole list to find the exact object to remove from list.
-
-
Alternative 2: Use a HashTable to store objects
-
Pros: Delete operation is O(1). Checking for duplicates before adding is also O(1) since HashTable does not allow duplicates
-
Cons: Can’t really manipulate data in the HashTable.
-
3.2. Find Feature
3.2.1. Current Implementation
The find mechanism is implemented by creating a keywordsMap which stores the searched keywords in a HashMap.
Based on the preceding prefixes of the user input, the tokenized argument is being stored as the value of the respective prefix key.
Candidates
The findCandidateCommand is facilitated by the CandidateContainsFindKeywordsPredicate which implements Predicate<Candidate>
and overrides the test and equal methods such that more fields can be searched at the same time.
Companies
The findCompanyCommand is facilitated by the CompanyContainsFindKeywordsPredicate which implements Predicate<Company>
and overrides the test and equal methods such that more fields can be searched at the same time.
Job Offers
The findJobOfferCommand is facilitated by the JobOfferContainsFindKeywordsPredicate which implements Predicate<JobOffer>
and overrides the test and equal methods such that more fields can be searched at the same time.
Through the test method, it compares every value in the keywordsMap with the respective field of each entry and returns true if the any part of the searched value can be found in the entry’s field.
The test method is facilitated by the following operations:
-
StringUtil#isWithinRange - checks whether the the job offer has an
AgeRangethat satisfies theAgeof thecandidate. -
StringUtil#isMoreThanOrEqualTo - checks whether the job offer has a
salaryoffer that is higher than thecandidate's expectedsalary.
After which, the mechanism updates either of the respective list which is exposed in the Model interface as either Model#updateFilteredCandidateList, Model#updateFilteredCompanyList or Model#updateCompanyJobList.
| Entering a prefix that is not recognized will throw a command exception. |
| The finding of all three entities (Candidate, Company, JobOffer) follow the same mechanism. |
An example usage scenario and how the find mechanism behaves at each step is shown below.
Step 1. The user launched the application for the first time.
-
UniqueCandidateListwill be initialised with the list of candidates in RecruitBook -
UniqueCompanyListwill be initialised with the list of saved companies inCompanyBook. -
UniqueCompanyJobListwill be initialised with the list of saved job offers inCompanyBook.
Step 2. The user executes findc n/Alex p/91234567 command to find the candidates who is named Alex or candidates who has the phone number 91234567.
The following sequence diagram shows how the find operation works:

3.2.2. Design Considerations
Aspect: How find feature executes
-
Alternative 1 (current choice): Having three variations of find feature for different entities.
-
Pros:
-
Greater distinction between the entities.
-
More direct and intuitive for users as candidate and company objects contain same prefixes such as phone, address and email address etc.
-
-
Cons:
-
More commands to deal with, same changes have to be made across all three commands.
-
It might not be that user-friendly for users who prefer an all-in-one
findcommand.
-
-
-
Alternative 2: Have a central
findManagerthat handles all finds.-
Pros: Lesser commands to handle, makes application easier for user to use
-
Cons: Some fields are found in both
candidateandcompany, making it difficult to distinguish between the two if the same prefix is entered.
-
Aspect: Data structure to support the find feature
-
Alternative 1 (current choice): Parses the user’s input into various arguments and compares each argument with each value in the object to test if it is contained in the object.
-
Pros:
-
Putting to and getting from a
HashMapis O(1), making it quick to add value or retrieve value for each comparison. -
User can input more than one field of the same prefix as a
HashMapis used here.
-
-
Cons: It is messy to implement, especially when different checks have to be made for different fields.
-
-
Alternative 2: Creates a
Listfor each prefix instead.-
Pros: Easier to manage,
testmethod should look neater. -
Cons: Takes O(N) to iterate through the
List, and does not check for duplicates.
-
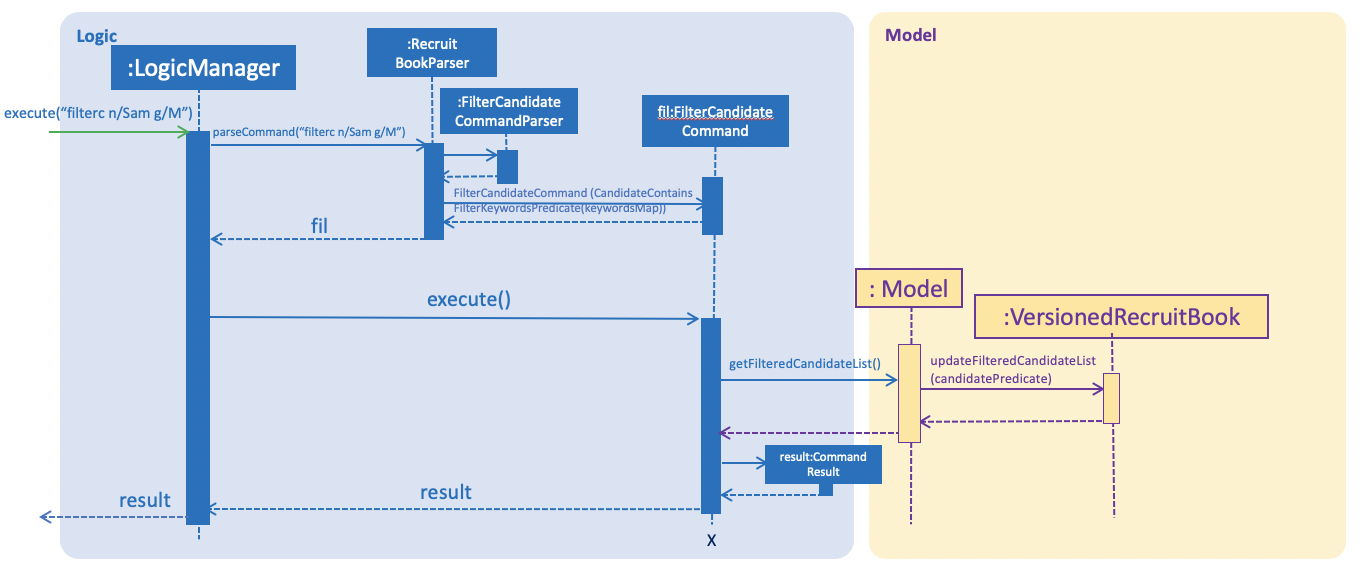
3.3. Filter Feature
3.3.1. Current Implementation
The filter feature differs from the find feature based on the fact that if any of the searched parameter is fulfilled, the overridden test method for the find feature returns true.
However, the overridden test method for filter is only asserted if all of the searched parameters are fulfilled.
Similar to the find mechanism, filter is implemented by creating a keywordsMap which stores the searched keywords in a HashMap.
Based on the preceding prefixes of the user input, the tokenized argument is being stored as the value of the respective prefix key.
Through the test method, it compares every value in the keywordsMap with the respective field of each entry and returns true if the object contains all the searched fields.
The test method is facilitated by the following operations (similar to find feature):
-
StringUtil#isWithinRange
-
StringUtil#isMoreThanOrEqualTo
After which, the respective list which is exposed in the Model interface is being updated.
| Entering a prefix that is not recognized will throw a command exception. |
| The filtering of all three entities (Candidate, Company, JobOffer) follow the same mechanism. |
An example usage scenario and how the filter mechanism behaves at each step is shown below.
Step 1. The user launched the application for the first time.
-
UniqueCandidateListwill be initialised with the list of candidates in RecruitBook -
UniqueCompanyListwill be initialised with the list of saved companies inCompanyBook. -
UniqueCompanyJobListwill be initialised with the list of saved job offers inCompanyBook.
Step 2. The user executes filterc n/Alex e/alexyeoh@example.com command to filter the candidates who is named Alex and has the email alexyeoh@example.com.
The following sequence diagram shows how the find operation works:
3.3.2. Design Considerations
Aspect: Data structure to support the filter feature
Design considerations for filter command is largely similar to find command as they both use similar mechanism.
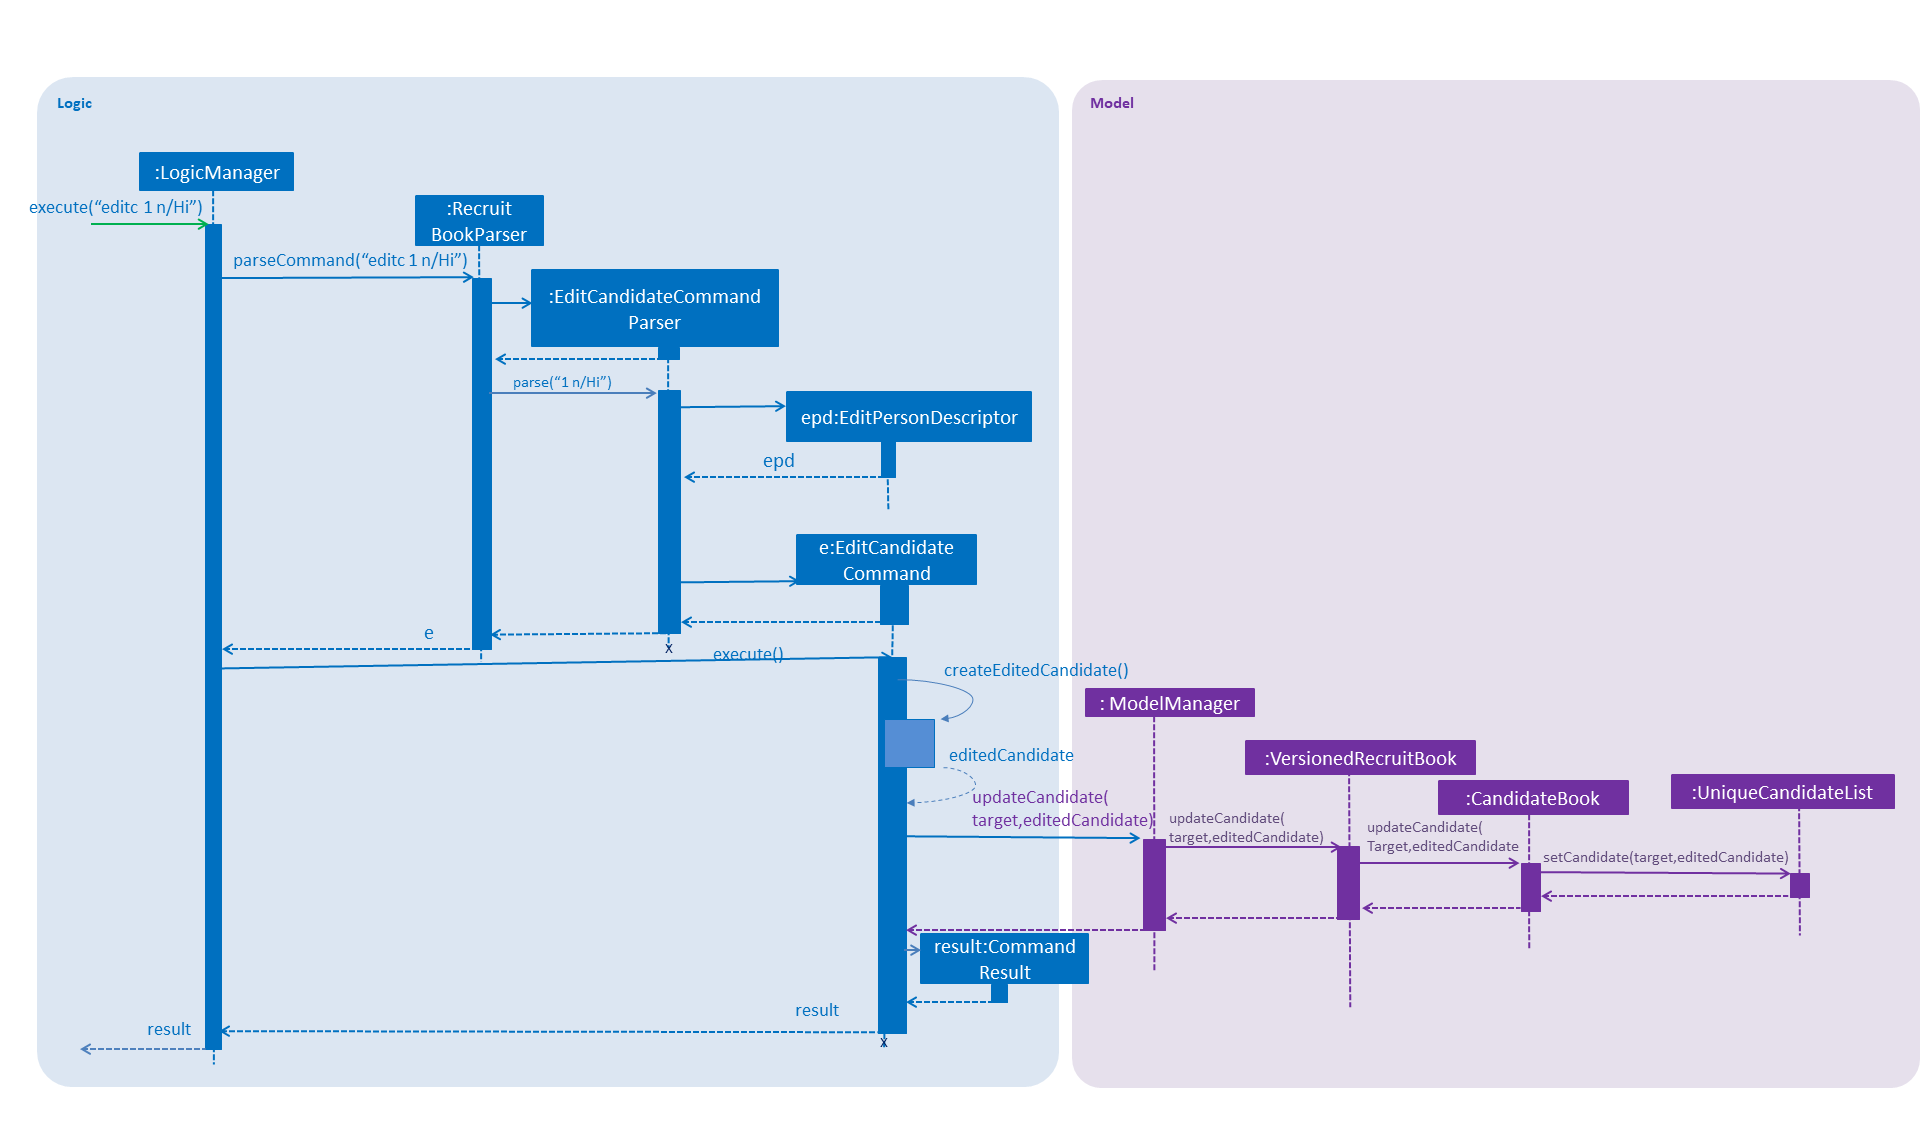
3.4. Edit Feature
3.4.1. Current Implementation
Candidates
The edit mechanism for candidates is facilitated by EditPersonDescriptor in EditCandidateCommand which creates a new Candidate object with edited attributes
and UniqueCandidateList which stores candidates internally as an internalList which is a list of Candidate objects.
Additionally, it implements the following operations to support the editing of candidates.
-
UniqueCandidateList#contains(Candidate candidate)— Checks whether a candidate exists insideinternalListusingCandidate#isSameCandidateto define equality. -
UniqueCandidateList#setCandidate(Candidate target, Candidate editedCandidate)— Replaces the Candidate object(target) in theinternalListto the newly edited Candidate object(editedCandidate) throughList#set(int index, E element).
These operations are exposed in the Model interface as Model#hasCandidate(Candidate candidate) and Model#updateCandidate(Candidate target, Candidate editedCandidate) respectively.
Companies
The edit mechanism for companies is facilitated by EditCompanyDescriptor in EditCompanyCommand which creates a new Company object with edited attributes
and UniqueCompanyList which stores companies internally as an internalList which is a list of Company objects.
Additionally, it implements the following operations to support the editing of companies.
-
UniqueCompanyList#contains(Company company)— Checks whether a company exists insideinternalListusingCompany#isSameCompanyto define equality. -
UniqueCompanyList#setCompany(Company target, Company editedCompany)— Replaces the Company object(target) in theinternalListto the newly edited Company object(editedCompany) throughList#set(int index, E element).
These operations are exposed in the Model interface as Model#hasCompany(Company company) and Model#updateCompany(Company target, Company editedCompany) respectively.
Job Offers
The edit mechanism for job offers is facilitated by EditJobOfferDescriptor in EditJobDetailsCommand which creates a new Job Offer object with edited attributes
and UniqueJobList which stores job offers internally as an internalList which is a list of Job Offer objects.
Additionally, it implements the following operations to support the editing of job offers.
-
UniqueJobList#contains(JobOffer jobOffer)— Checks whether a job offer exists insideinternalListusingJobOffer#isSameJobOfferto define equality. -
UniqueJobList#setJobOffer(JobOffer target, JobOffer editedJobOffer)— Replaces the Job Offer object(target) in theinternalListto the newly edited Job Offer object(editedJobOffer) throughList#set(int index, E element).
These operations are exposed in the Model interface as Model#hasJobOffer(JobOffer jobOffer) and Model#updateJobOffer(JobOffer target, JobOffer editedJobOffer) respectively.
| If you try to edit the job offer to have a company name that does not exist in the book, it will trigger a command exception! |
| The editing of all three entities (Candidate, Company, JobOffer) follow the same mechanism. |
Given below is an example usage scenario and how the edit mechanism behaves at each step.
Step 1. The user launches RecruitBook for the first time.
-
UniqueCandidateListwill be initialised with the list of saved candidates in RecruitBook -
UniqueCompanyListwill be initialised with the list of saved companies in RecruitBook -
UniqueJobListwill be initialised with the list of saved job offers.Assume that upon initialisation, there are candidate, company and job offer entries in RecruitBook.
Step 2. The user executes …
-
editc 1 n/John Doeto edit the name of the 1st person in the RecruitBook.-
The name attribute in
EditPersonDescriptorinEditCandidateCommandhas been set to "John Doe" and the descriptor is used to compare with the original Candidate object and a new Candidate object is created with the name being "John Doe". -
EditCandidateCommandthen callsModel#hasCandidate(Candidate candidate)to check if the edited candidate has a duplicate in the RecruitBook. If not,Model#updateCandidate(Candidate target, Candidate editedCandidate)is then called that replaces the original Candidate object with the newly edited one.
-
-
editC 1 c/KFCto edit the name of the 1st company in the RecruitBook.-
The name attribute in
EditCompanyDescriptorinEditCompanyCommandhas been set to "KFC" and the descriptor is used to compare with the original Company object and a new Company object is created with the name being "KFC". -
EditCompanyCommandthen callsModel#hasCompany(Company company)to check if the edited company has a duplicate in the RecruitBook. If not,Model#updateCompany(Company target, Company editedCompany)is then called that replaces the original Company object with the newly edited one.
-
-
editj 1 j/Cashierto edit the job title of the 1st job offer in the RecruitBook.-
The job title attribute in
EditJobOfferDescriptorinEditJobDetailsCommandhas been set to "Cashier" and the descriptor is used to compare with the original JobOffer object and a new JobOffer object is created with the job title being "Cashier". -
EditJobDetailsCommandthen callsModel#hasJobOffer(JobOffer jobOffer)to check if the edited job offer has a duplicate in the RecruitBook. If not,Model#updateJobOffer(JobOffer target, JobOffer editedJobOffer)is then called that replaces the original JobOffer object with the newly edited one.Any duplicates formed after editing will not replace the original object. It will prompt an error message
-
The following sequence diagram shows how the edit operation works for editc:
All three variations of edit follows the same sequence during operation
|
3.4.2. Design Considerations
How edit executes
-
Alternative 1 (current choice): Replaces the original object with an edited one.
-
Pros: If the edited object were to result in errors, it can be prevented from replacing the original object.
-
Cons: It is less efficient as compared to editing the original object straightaway.
-
-
Alternative 2: Editing the original object instead of replacing it with an edited one.
-
Pros: It is more intuitive and efficient.
-
Cons: The edited object cannot be checked for duplicates without permanently changing the object first.
-
Data structure to support the edit command
-
Alternative 1 (current choice): Separating the editing feature into 3 commands for different entities.
-
Pros: Greater distinction between the entities.
-
Cons: More commands to deal with (similar commands across all three entities).
-
-
Alternative 2: Have a central
EditManagerthat handles all edits.-
Pros: Reduction of command objects (less confusing).
-
Cons: There is coupling between the manager and the individual commands. Changes to an entity has to be cascaded to the manager.
-
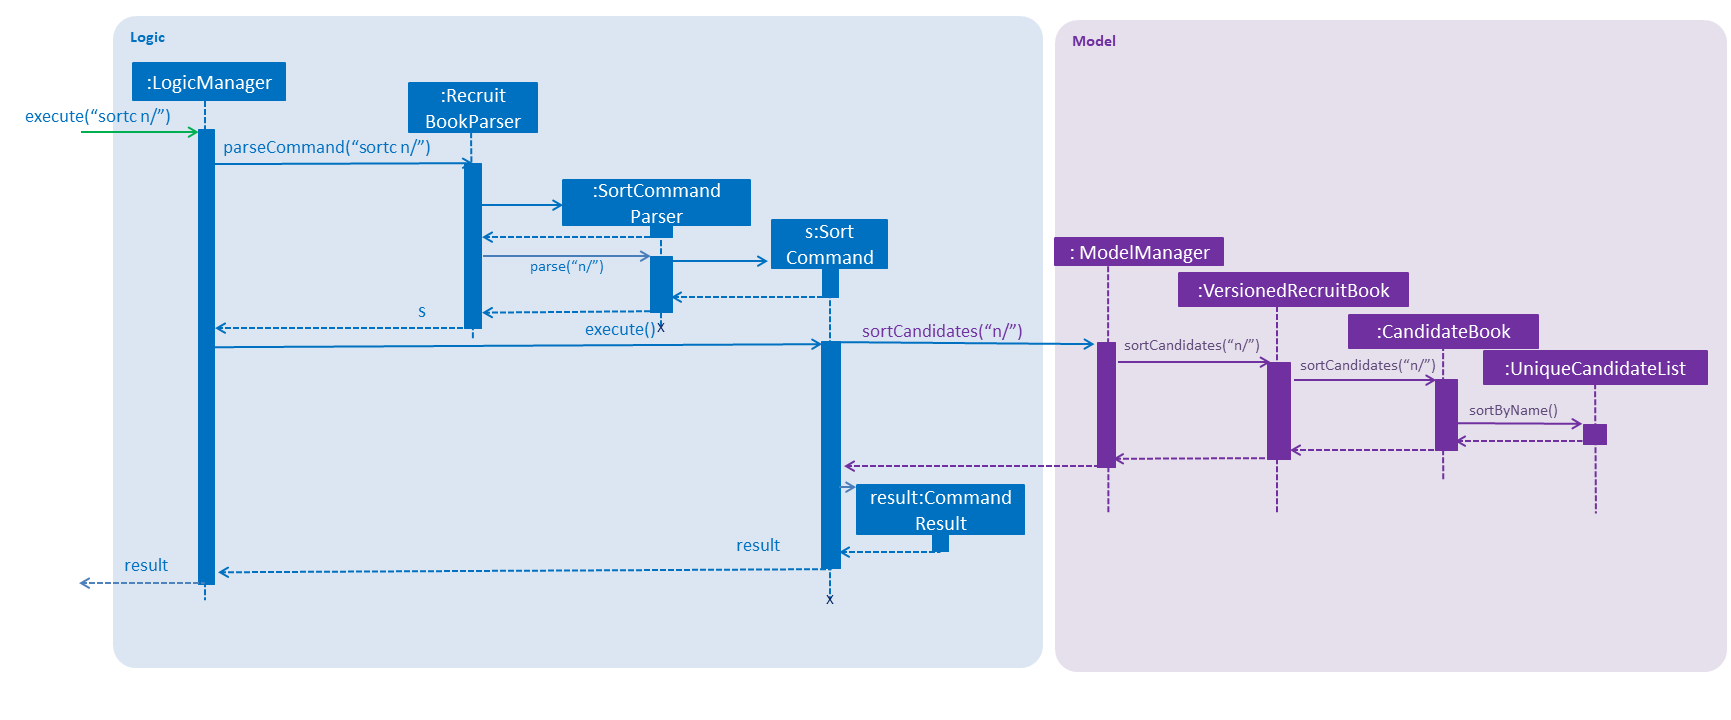
3.5. Sort Feature
3.5.1. Current Implementation
Candidates
The sort mechanism of candidates is facilitated in UniqueCandidateList which stores candidates in an internalList. It implements the sorting of candidates using the following operations:
-
UniqueCandidateList#sortByName()— Sorts theinternalListof Candidates by their names. -
UniqueCandidateList#sortByAge()— Sorts theinternalListof Candidates by their age. -
UniqueCandidateList#sortByEmail()— Sorts theinternalListof Candidates by their emails. -
UniqueCandidateList#sortByJob()— Sorts theinternalListof Candidates by their job titles. -
UniqueCandidateList#sortByEducation()— Sorts theinternalListof Candidates by their education levels. -
UniqueCandidateList#sortBySalary()— Sorts theinternalListof Candidates by their salaries. -
UniqueCandidateList#sortInReverse()— Sorts theinternalListof Candidates in reverse order of their current order.
These operations are accessed through the Model interface as Model#sortCandidates(Prefix prefix) which then calls the respective sorting method by determining the prefix type in CandidateBook.
These prefixes n/, x/, e/, j/, h/, s/, r/ are used respectively to the methods shown above.
|
Companies
The sort mechanism of companies is facilitated in UniqueCompanyList which stores companies in an internalList. It implements the sorting of companies using the following operations:
-
UniqueCompanyList#sortByCompanyName()— Sorts theinternalListof Companies by their names. -
UniqueCompanyList#sortByEmail()— Sorts theinternalListof Companies by their emails. -
UniqueCompanyList#sortInReverse()— Sorts theinternalListof Companies in reverse order of their current order.
These operations are accessed through the Model interface as Model#sortCompanies(Prefix prefix) which then calls the respective sorting method by determining the prefix type in CompanyBook.
These prefixes c/, e/, r/ are used respectively to the methods shown above.
|
Job Offers
The sort mechanism of job offers is facilitated in UniqueCompanyJobList which stores job offers in an internalList. It implements the sorting of job offers using the following operations:
-
UniqueCompanyJobList#sortByCompanyName()— Sorts theinternalListof Job Offers by the company names they are attached to. -
UniqueCompanyJobList#sortByJob()— Sorts theinternalListof Job Offers by their job titles. -
UniqueCompanyJobList#sortByAgeRange()— Sorts theinternalListof Job Offers by the minimum age of their required age ranges. -
UniqueCompanyJobList#sortByEducation()— Sorts theinternalListof Job Offers by their required education levels. -
UniqueCompanyJobList#sortBySalary()— Sorts theinternalListof Job Offers by their salaries. -
UniqueCompanyJobList#sortInReverse()— Sorts theinternalListof Job Offers in reverse order of their current order.
These operations are accessed through the Model interface as Model#sortJobOffers(Prefix prefix) which then calls the respective sorting method by determining the prefix type in CompanyBook.
These prefixes c/, j/, xr/, h/, s/, r/ are used respectively to the methods shown above.
|
Given below is an example usage scenario and how the sort command behaves at each step.
Step 1. The user launches RecruitBook for the first time.
-
UniqueCandidateListwill be initialised with the list of saved candidates inCandidateBook. -
UniqueCompanyListwill be initialised with the list of saved companies inCompanyBook. -
UniqueCompanyJobListwill be initialised with the list of saved job offers inCompanyBook.
| Assume that upon initialisation, there are candidate, company and job entries in RecruitBook. |
Step 2. The user executes…
-
sortc s/to sort the list of candidates based on their salaries.-
s/prefix is used which calls theUniqueCandidateList#sortBySalary()fromCandidateBook. -
The
internalListwithinCandidateBookis then sorted numerically based on salary and the newly sorted list will be reflected in theMainWindowof RecruitBook.
-
-
sortC c/to sort the list of companies based on their names.-
c/prefix is used which calls theUniqueCompanyList#sortByCompanyName()fromCompanyBook. -
The
internalListwithinCompanyBookis then sorted lexicographically based on their names and the newly sorted list will be reflected in theMainWindowof RecruitBook.
-
-
sortj j/to sort the list of job offers based on their title.-
j/prefix is used which calls theUniqueCompanyJobList#sortByJob()fromCompanyBook. -
The
internalListwithinUniqueCompanyJobListis then sorted lexicographically based on their titles and the newly sorted list will be reflected in theMainWindowof RecruitBook.
-
Step 3. The user does not want the candidates to be sorted in increasing order of their salaries but decreasing order. So, the user executes
-
sortc r/to sort the list of candidates in the reverse order of the current order.
The following sequence diagram shows how the sort operation works:
All three variations of the sort command follows the same sequence during operation.
|
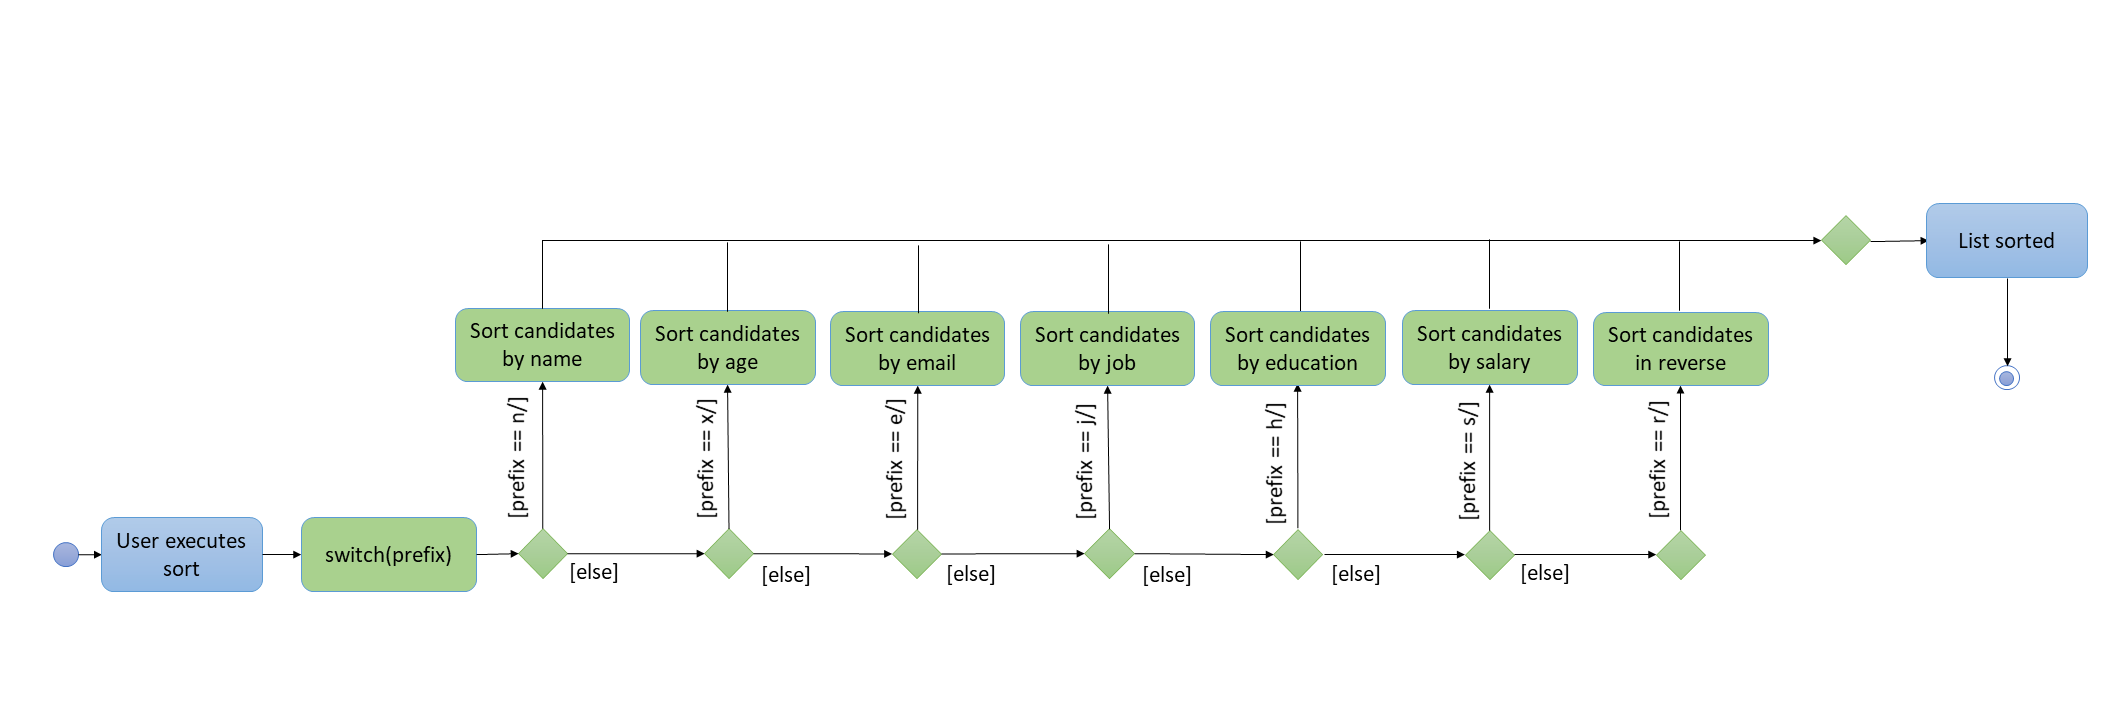
The following activity diagram summarizes what happens when a user executes sortc command:
All three variations of the sort command follows a similar activity flow, with different cases for switch(prefix).
|
3.5.2. Design Considerations
Aspect: How sort executes
-
Alternative 1(current choice): Store the input prefix as a parameter to be passed in to the respective books which calls the respective method.
-
Pros: The variations of sort methods are stored under
UniqueCandidateListinstead of having more command objects. -
Cons: Implementation of switch case statements in both books which could lead to poorer performance.
-
-
Alternative 2: Create multiple sort commands for the various attributes.
-
Pros: The implementation would give a better performance.
-
Cons: There will be about 10 more newly added command objects which makes it confusing when dealing with many similar commands.
-
3.6. Blacklist Feature
3.6.1. Current Implementation
The blacklist mechanism is facilitated by UniqueCandidateList that is stored in the CandidateBook (as internalList). This feature is also supported by Model#getFilteredCandidateList where the input index is used to obtain the Candidate object from the observable list.
Additionally, it implements the following operations:
-
UniqueCandidateList#setCandidate(Candidate target, Candidate editedCandidate)— Replaces the original Candidate object in theinternalListwith the newly edited Candidate object.
This operation is exposed in the Model interface as Model#updateCandidate(Candidate target, Candidate editedCandidate).
| There is no duplicate check unlike edit as blacklist only involve tags and they are not attributes that determine the uniqueness of candidates. |
Given below is an example usage scenario and how the blacklist command behaves at each step.
Step 1. The user launches RecruitBook for the first time.
-
UniqueCandidateListis initialised with the saved data of Candidates in RecuitBook.
| Assume that upon initialisation, there are candidate entries in RecruitBook. |
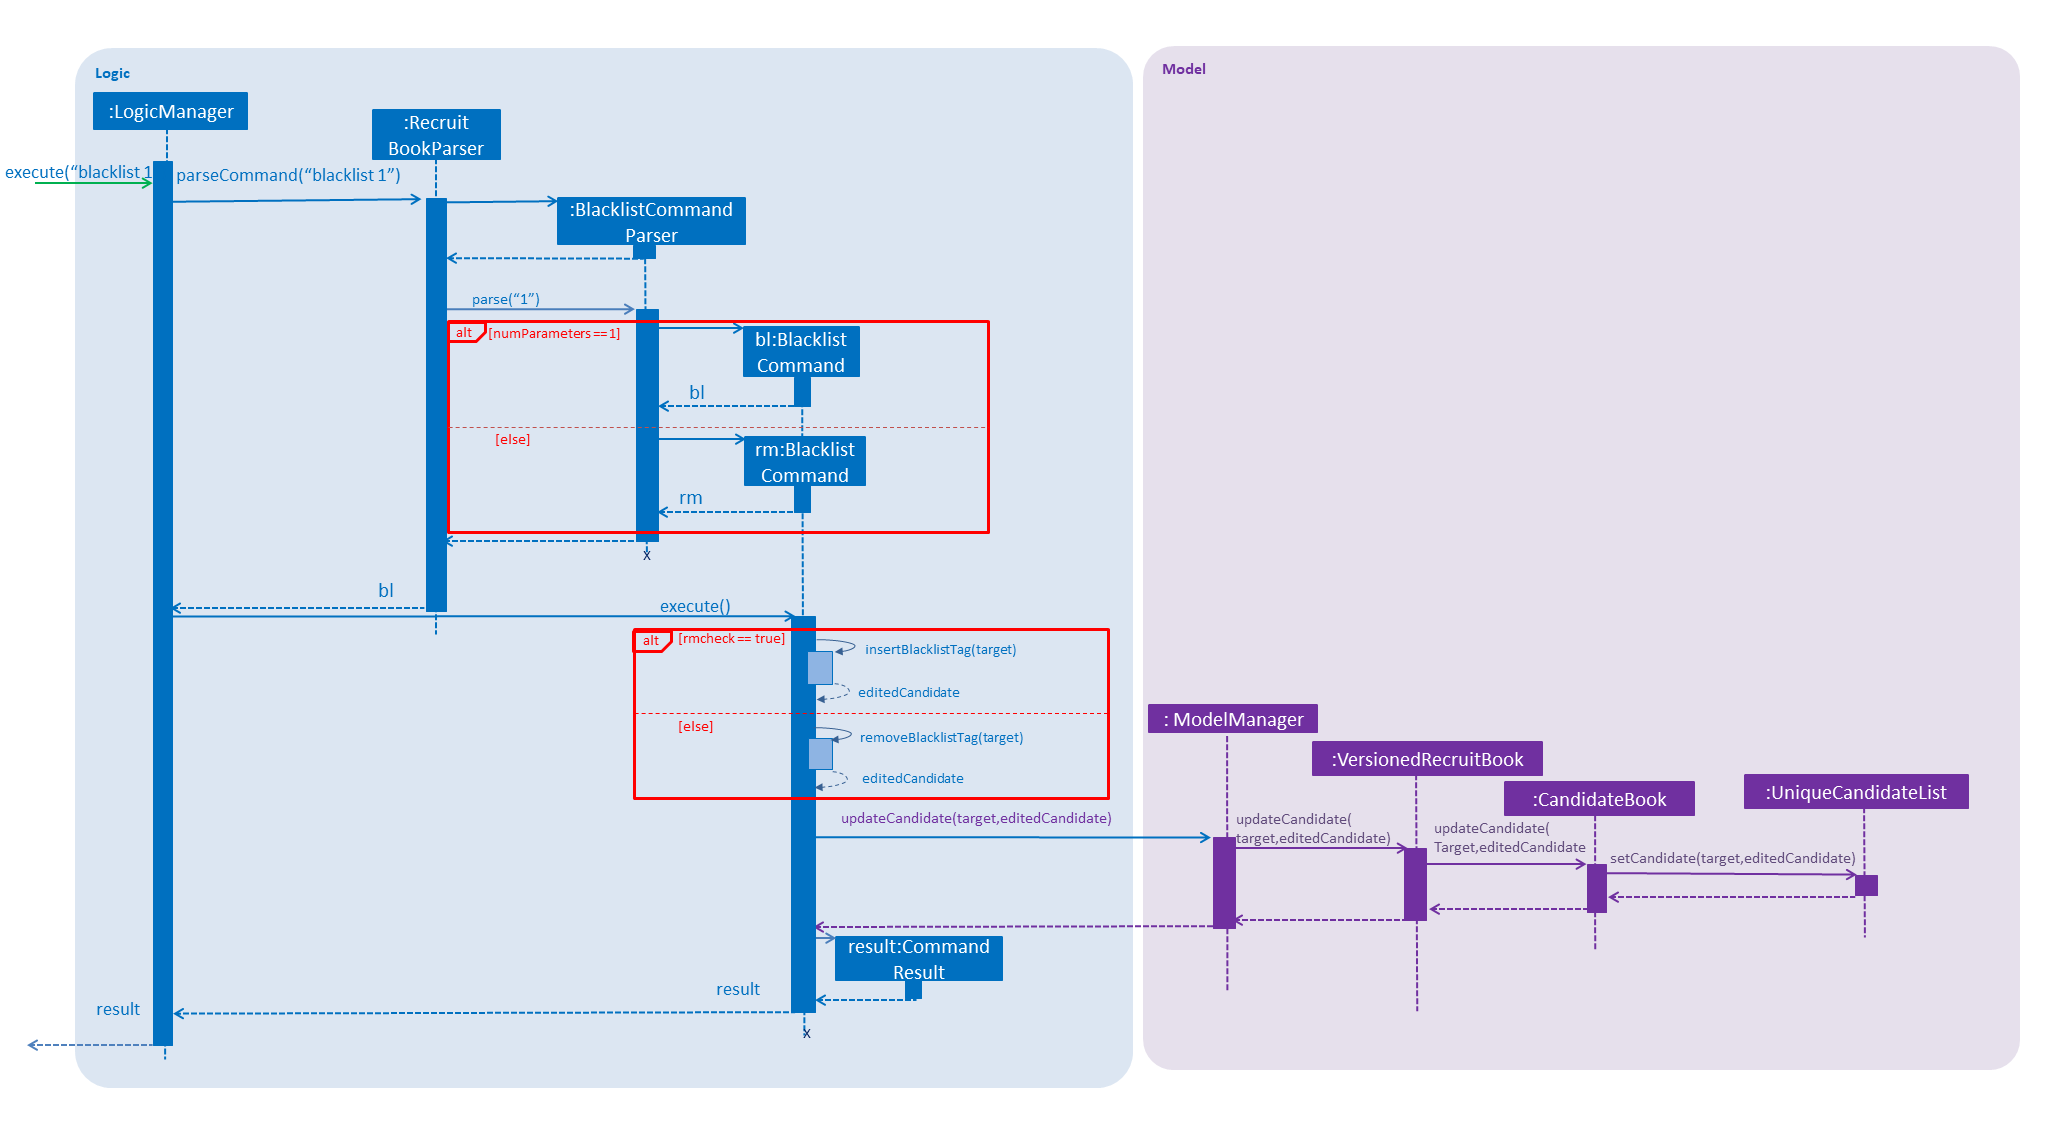
Step 2. The user executes blacklist 1 command to blacklist the 1st candidate in the candidate book. If there are no errors, the 1st candidate will be blacklisted and a "BLACKLISTED" tag will appear in its entry.
-
It achieves this by generating a new Candidate object with a blacklist tag then replaces the original Candidate object in the
internalList.
Step 3. The user executes editc 1 n/James. This command will fail to execute as blacklisted candidates cannot be edited or shortlisted. An error message will appear.
Step 4. The user decides that blacklisting the candidate was a mistake and proceeds to remove the blacklist.
-
blacklist rm 1is executed. The 1st candidate will no longer be blacklisted and the "BLACKLISTED" tag will be removed from its entry. -
It achieves this by generating a new Candidate object without a blacklist tag which replaces the original blacklisted Candidate in the
internalList.
|
Trying to blacklist an already blacklisted candidate will prompt an error message. Unblacklisting a candidate who is not blacklisted will do likewise. |
The following sequence diagram shows how the blacklist operation works:
3.6.2. Design considerations
Aspect: How blacklist executes
-
Alternative 1(current choice): Creates a new Candidate object for adding or removal of blacklist.
-
Pros: Less error prone as compared to editing candidates straight.
-
Cons: It is less efficient to regenerate objects as compared to directing editing of candidates.
-
-
Alternative 2: Editing the tags of the Candidate directly.
-
Pros: More intuitive and efficient.
-
Cons: Code becomes less defensive as any changes will be permanent reflected in that candidate.
-
Aspect: Data structure to support the blacklist command
-
Alternative 1(current choice): Add blacklist tags into the candidates.
-
Pros: Blacklisting can be immediately displayed on entries.
-
Cons: There is no organised data structure that accommodates all blacklisted candidates, so if there is a need for all blacklisted candidates, every candidate has to be checked.
-
-
Alternative 2: Store blacklisted candidates in a list.
-
Pros: There is a one-stop collection of blacklisted candidates.
-
Cons: To check if a candidate if blacklisted, a loop has to be used to check the list. (slows the execution of edit and shortlist).
-
3.7. Shortlist Feature
3.7.1. Current Implementation
Shortlisting a Candidate
The shortlist mechanism is facilitated by selectc, selectC and selectj command. The parsing of these commands
is facilitated by ShortlistParser.
It extends CompanyBook with a list of shortlisted candidate(s) for each job offer, stored internally as a
Unique Candidate List called candidateList. The reason for storing as a unique list is to prevent duplicated
candidates from being added into the same candidateList. It also uses EventsCenter to post a new ChangeLogicStateEvent so that
LogicManager will handle the event with its handleChangeLogicStateEvent method.
It is a 5-stage process supported by LogicManager by keeping track of the LogicState.
-
primary -
SelectCompanyForShortlist -
SelectJobForShortlist -
SelectCandidate -
ShortlistCandidate
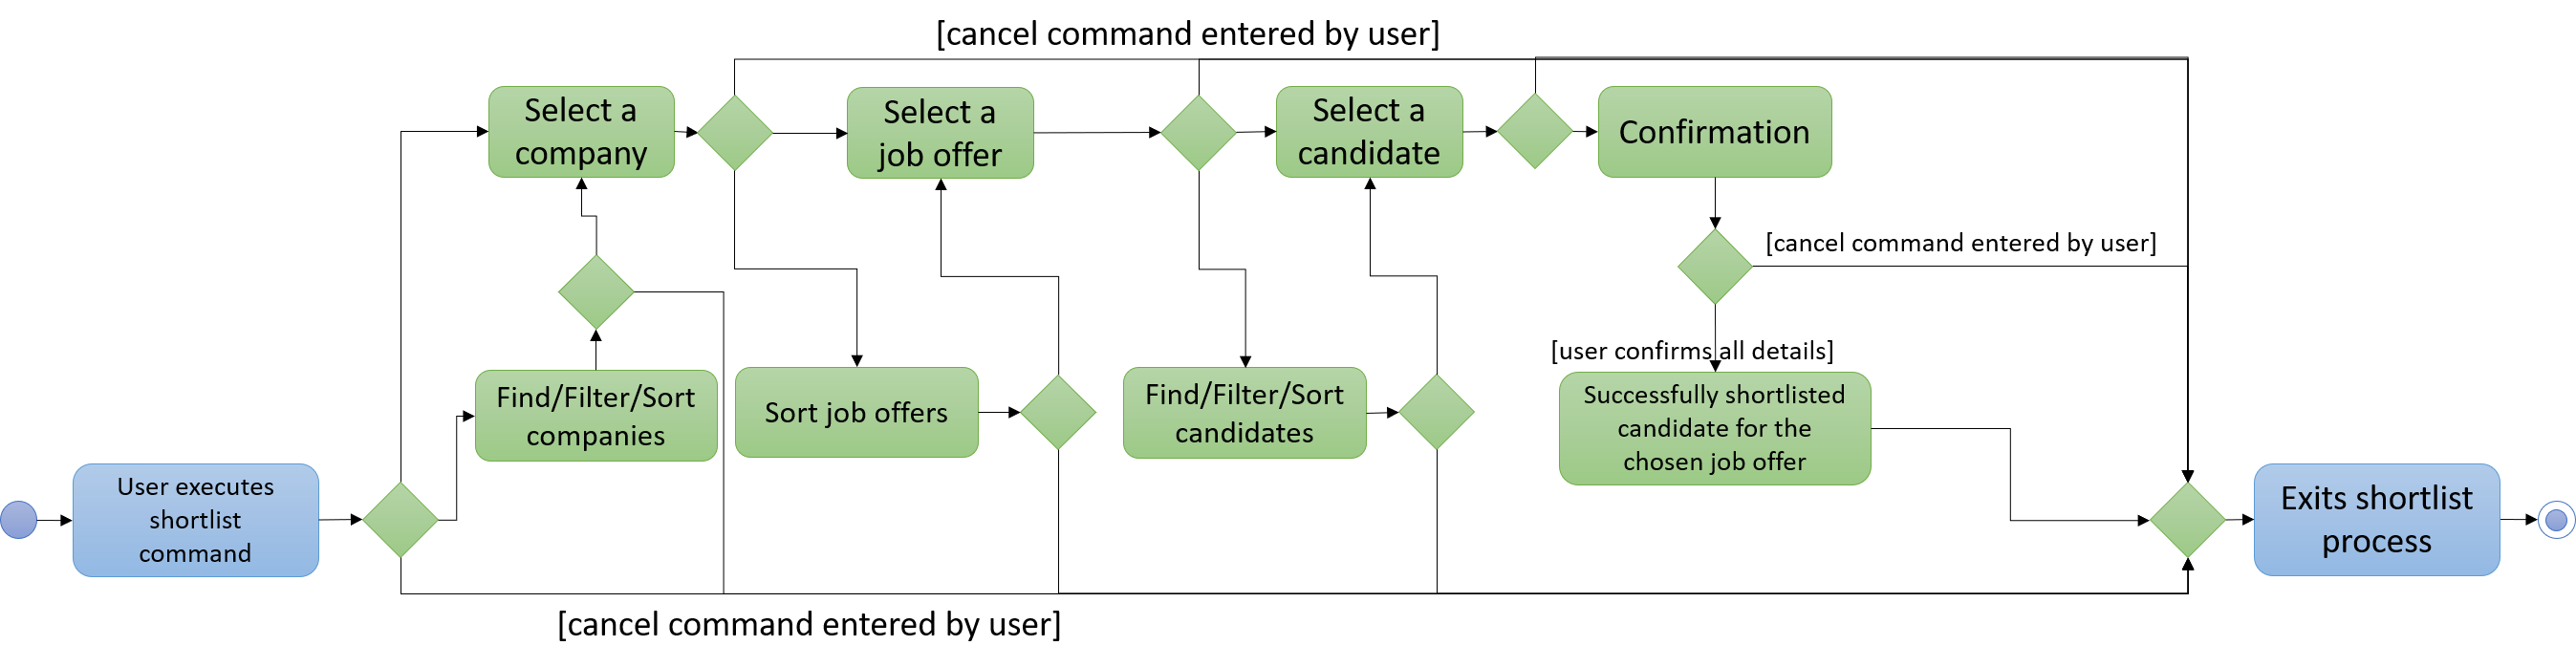
Given below is an example usage scenario and how the shortlist mechanism behaves at each step.
| x refers to the index from user input. |
-
User launches the application. RecruitBook sets up the Candidate Book and Company Book respectively.
Assume that there are candidates and companies present in the data of RecruitBook, but no job offer. -
User adds a new job offer
Cashierunder the existing companyKFC.Since RecruitBook opens up Candidate Book by default, adding a job offer will automatically switch the view to Company Book. -
RecruitBook creates a new object
CashierwithJobOfferclass. Hence,CashierhascandidateListas one of its attributes.candidateListis empty upon creation of theCashierobject. -
User executes
shortlistcommand. The view changes fromCompany BooktoShortlistPanel.ShortlistPanellists out all the candidates, companies and job offers. -
RecruitBook enters Stage 2 of the shortlisting process to shortlist a candidate for a job offer. This is implemented by
LogicManagerwheresetLogicStateis called in each stage to connect one after another. User will need to executecancelcommand to exit from the shortlist process. The 5-stage process is described in order below.-
shortlist→ User initializes the shortlisting process. -
selectC x→ User selects the company of the job offer.sortC,findCandfilterCcommands can be used to easily locate the company before selecting it. -
selectj x→ User selects the job offer.sortjcommand can be used to easily locate the job offer before selecting it. -
selectc x→ User selects the candidate to shortlist.sortc,findcandfilterccommands can be used to easily locate the candidate before selecting. -
confirm→ User confirms the above inputs.
-
-
RecruitBook proceeds to add shortlisted candidate through
Model.ModelManagerconnects thecandidateListof the job offer inJobOfferclass toModel, which then connects toCommand. -
Model.shortlistCandidateToJobOffer()method adds the shortlisted candidate into thecandidateList. -
candidateListis linked to the job offer.You can access this list by calling selectedJob.getUniqueCandidateList(). -
model.commitRecruitBook()is then called to indicate that Company Book has been changed. -
RecruitBook exits the shortlisting process and returns your view to your last viewed book.
The following sequence diagram shows how the shortlist operation works:

The following activity diagram summarizes what happens when a user executes shortlist command:
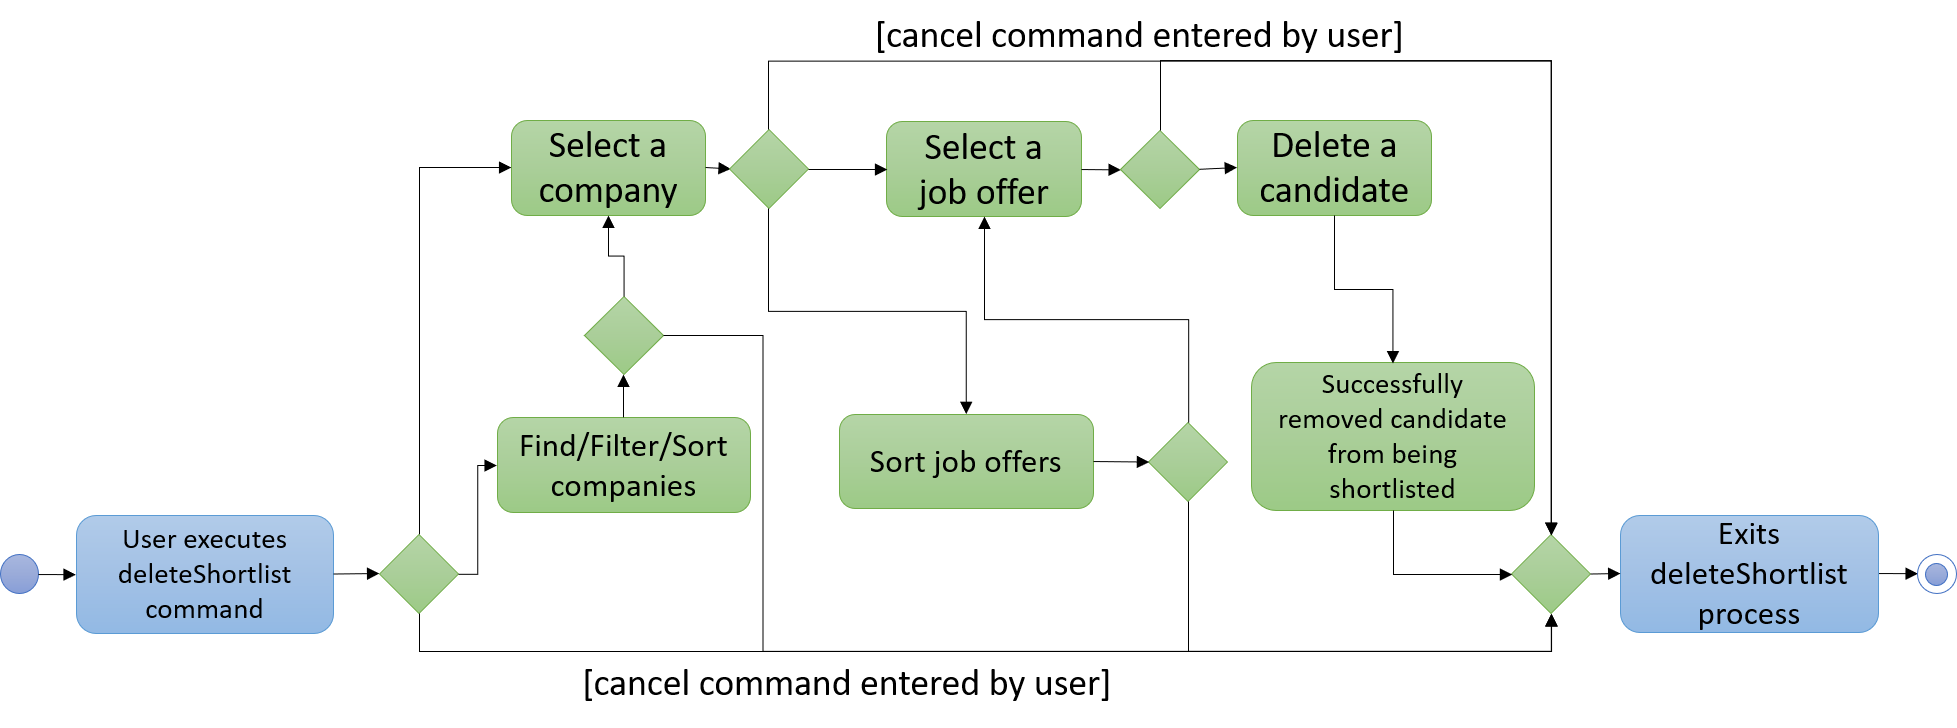
Deleting a Shortlisted Candidate
Deletion of a shortlisted candidate uses similar implementation as Section 3.7.1.1, “Shortlisting a Candidate”.
The shortlist mechanism is facilitated by selectC and selectj command. The parsing of these commands
is facilitated by ShortlistParser.
It deletes a shortlisted candidate from the candidateList through Model.
Deleting a shortlisted candidate does not delete the candidate from Candidate Book. It simply
removes the candidate from the list of shortlisted candidates for that particular job offer.
|
It also uses EventsCenter to post a new ChangeLogicStateEvent so that
LogicManager will handle the event with its handleChangeLogicStateEvent method.
It is a 4-stage process supported by LogicManager by keeping track of the LogicState.
-
primary -
SelectCompanyForShortlistDelete -
SelectJobForShortlistDelete -
DeleteShortlistedCandidate
Given below is an example usage scenario and how the delete mechanism behaves at each step.
| x refers to the index from user input. |
-
User launches the application. RecruitBook sets up the Candidate Book and Company Book respectively.
Assume that there is at least one shortlisted candidate for the job offer selected by user. -
User executes
deleteShortlistcommand.Since RecruitBook opens up Candidate Book by default, entering the delete process for shortlisted candidates will automatically switch the view to Company Book. -
RecruitBook enters Stage 2 of the deleting process. This is implemented by
LogicManagerwheresetLogicStateis called in each stage to connect one after another. User will need to executecancelcommand to exit from the shortlist process. The 4-stage process is described in order below.-
deleteShortlist→ User initializes the deleting process. -
selectC x→ User selects the company of the job offer.sortC,findCandfilterCcommands can be used to easily locate the company before selecting it. -
selectj x→ User selects the job offer.sortjcommand can be used to easily locate the job offer before selecting it. -
delete x→ User selects the candidate to delete.
-
-
RecruitBook proceeds to delete the shortlisted candidate through
Model.ModelManagerconnects thecandidateListof the job offer inJobOfferclass toModel, which then connects toCommand. -
Model.deleteShortlistedCandidateFromJobOffer()method deletes the shortlisted candidate from thecandidateList.This command checks if the selected candidate exists inside candidateListby evaluating a boolean statementselectedJob.getUniqueCandidateList().contains(selectedCandidate). If the candidate does not exists inside the list, this command returns a message to be displayed to inform the user. -
model.commitRecruitBook()is then called to indicate that Company Book has been changed. -
RecruitBook exits the deleting process.
The following activity diagram summarizes what happens when a user executes deleteShortlist command:
3.7.2. Design Considerations
Aspect: How shortlist feature executes
-
Alternative 1 (current choice): Use existing
selectc,selectCandselectjcommands.-
Pros: Easy to implement.
-
Cons: May have performance issues in terms of memory usage.
-
-
Alternative 2: Shortlist command executes the 5-stage process by itself.
-
Pros: Does not need to rely on
LogicManagerto facilitate the process. -
Cons: We must implement 3 fields for user input
shortlist Candidate/[input] Company/[input] Job/[input]and store separately from the Candidate Book and Company Book. Furthermore, we have to filter by job offer and store the data into an observable list on the UI when the user wants to view the shortlisted candidates for a certain job offer.
-
Aspect: Data structure to support the shortlist feature
-
Alternative 1 (current choice): Use a list to store the shortlisted candidates and attach this list to the respective job offer.
-
Pros: Easy for new Computer Science student undergraduates to understand, who are likely to be the new incoming developers of our project.
-
Cons: Increases coupling between
JobOfferandShortlistCandidateCommand.
-
-
Alternative 2: Use a HashMap to store the shortlisted candidates as the
keyand the respective job offers as thevalue.-
Pros: We do not need to set
shortlistedCandidateListas an attribute in each theJobOfferobject. This would use less memory as it only takes a HashMap to store all the shortlisted candidates along with the job offers. Furthermore, this reduces coupling betweenJobOfferandShortlistCandidateCommand. -
Cons: HashMap only allows unique
keys. In other words, HashMap does not allow duplicates of candidates to be stored. However, in RecruitBook, user should be able to shortlist a candidate for multiple job offers. Hence, we need to further implement a list of job offers to be stored as thevaluefor each candidate so as to store multiple job offers under the same candidatekey.
-
3.8. Switch Book Feature
3.8.1. Current Implementation
The switching mechanism is facilitated by MainWindow, with the latter’s switchToCandidateBook and switchToCompanyBook methods.
It extends Command with EventsCenter, where it uses EventsCenter to post a new SwitchBookRequestEvent so that
MainWindow will handle the event with its handleSwitchBookEvent method.
MainWindow knows an event is posted because it is subscribed to the event bus com.google.common.eventbus.Subscribe. It will
handle any event that matches the parameter of the handling methods in MainWindow class.
For example, SwitchBookRequestEvent will match with the handleSwitchBookEvent(SwitchBookRequestEvent event) as the parameter matches.
|
As mentioned above, inside MainWindow, there are 5 placeholders and
the panelViewPlaceholder can hold either CandidateDetailsPanel, CompanyJobDetailsPanel or ShortlistPanel.
The methods switchToCandidateBook and switchToCompanyBook work by placing the desired panel in panelViewPlaceholder, to be shown on the MainWindow.
Given below is an example usage scenario for switching from Candidate Book to Company Book and how the switching mechanism behaves at each step.
-
User launches the application.
MainWindowinitialises the panelViewPlaceholder withCandidateDetailsPanel.This means the default view of RecruitBook is the Candidate Book. -
User executes
switchcommand, which posts aSwitchBookRequestEvent. -
MainWindow handles the posted
SwitchBookRequestEventwith its methodhandleSwitchBookEvent. -
Inside this method, it checks which book is currently displayed by calling the method
getDisplayedBook. -
getDisplayedBookreturnscandidateBookas a string. -
Using a switch statement, case
candidateBookwill execute and call forswitchToCompanyBookmethod. -
switchToCompanyBookmethod places theCompanyJobDetailsPanelinto panelViewPlaceholder to switch the viewIn order to add a panel into panelViewPlaceholder, the existing panel needs to be removed so that there will not be duplicated panels insidepanelViewPlaceholder. There will be a compilation error if there are duplicated panels.
3.8.2. Design Considerations
Aspect: How switch feature executes
-
Alternative 1 (current choice): Use
EventsCenterto post events andMainWindowto handle these events.-
Pros: Easy to implement. Neat and clean code with less coupling.
MainWindowhas private methods and variables to prevent unauthorised access for better integrity purposes. -
Cons: -
-
-
Alternative 2: Allow all methods in MainWindow to be static and public.
-
Pros: Other classes can have easy access to the switching methods and their variables.
-
Cons: May face integrity issues due to public access of MainWindow. Increases unnecessary coupling.
-
Aspect: Data structure to support the switch feature
-
Alternative 1 (current choice): The only variable that
MainWindowhas to keep track of iscurrentBook.-
Pros: Easy to keep track as
currentBookis set tocandidateBookorcompanyBookaccordingly. -
Cons:
currentBookis a string variable. Misspelling ofcandidateBookorcompanyBookin code may result in a bug.
-
-
Alternative 2: Store
currentBookas booleanisCandidateBook, with the boolean returning true if the current book is Candidate Book, and returning false if the current book is Company Book.-
Pros: Eliminates the possibility of misspelling the books.
-
Cons: Can be confusing for multiple contributors. There is also an assumption that there are only 2 distinct cases of the view of
panelViewPlaceholder, which is not the case as we introduced another viewShortlistPanel.
-
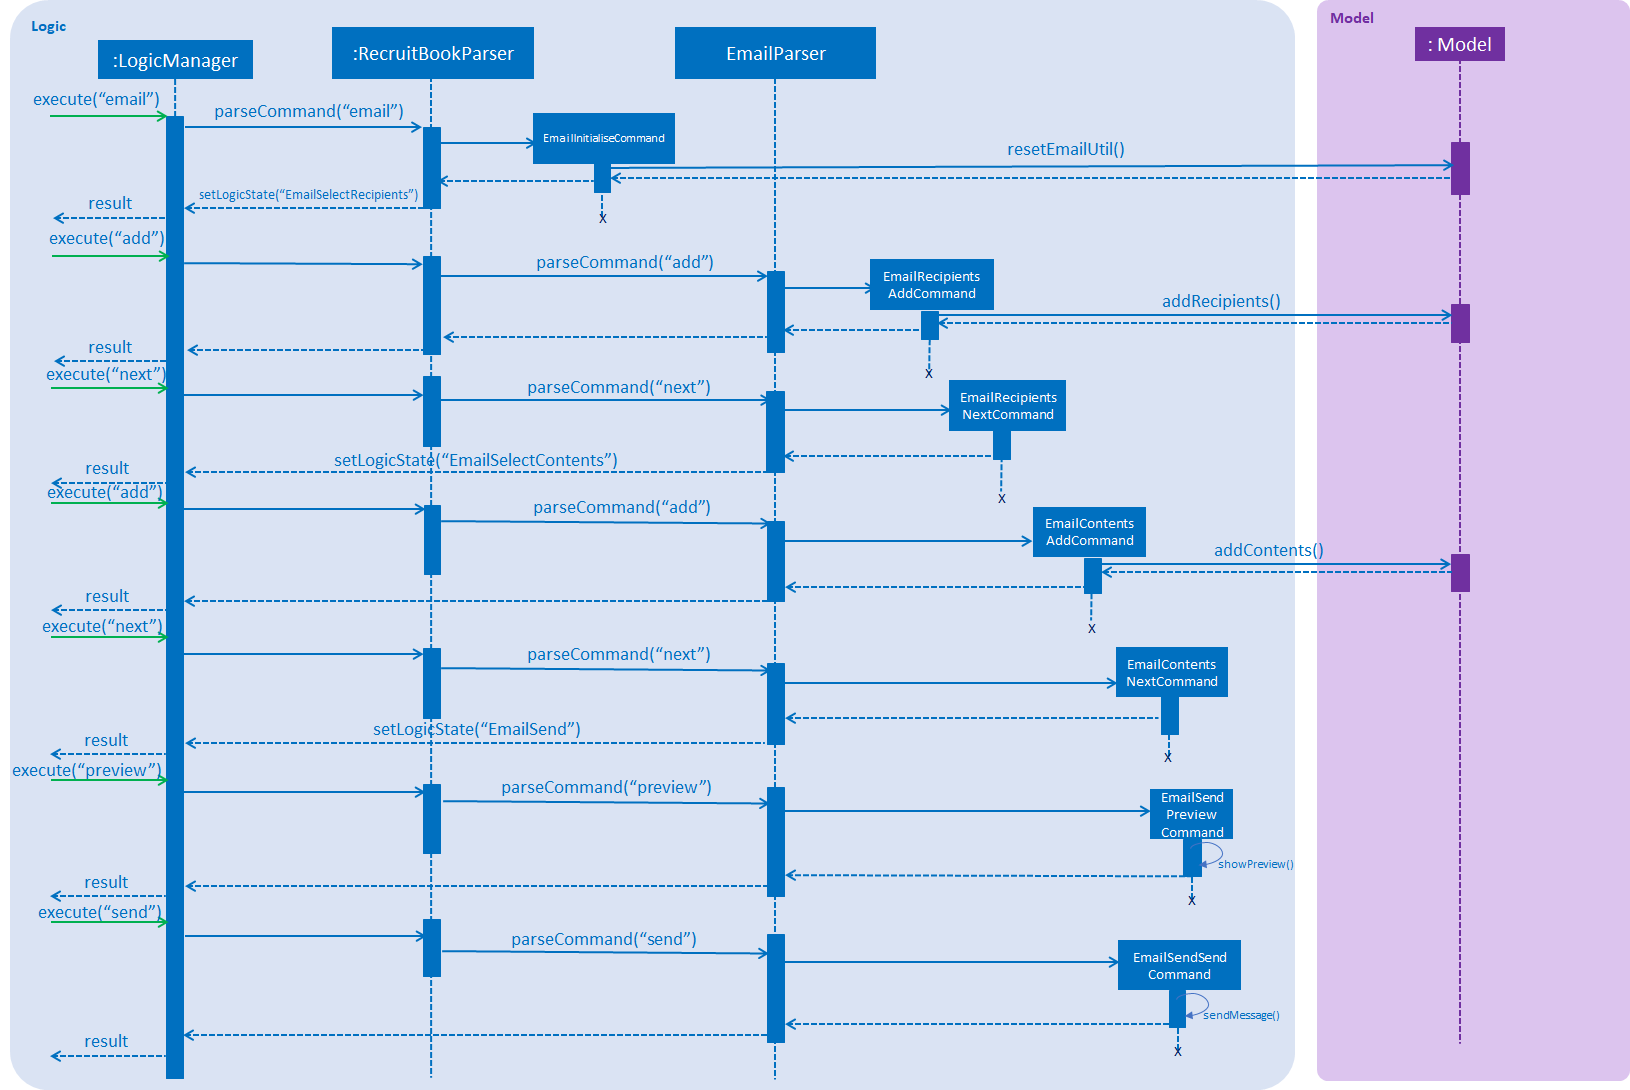
3.9. Email command
3.9.1. Current Implementation
The email command is facilitated by EmailInitialiseCommand, EmailRecipientsCommand, EmailContentsCommand and EmailSendCommand
classes which extends the Command class, and EmailUtil attribute in Model which stores variables and methods pertaining to the email command
and the EmailSettings class which stores email subject and email body text settings.
The email command is a 4-stage process supported by LogicManager by keeping track of the LogicState.
-
Initialisation, facilitated by
EmailInitialiseCommand. -
Choosing your recipients, facilitated by
EmailRecipientsCommand. Within which exists the following sub-stages:-
Adding recipients, facilitated by
EmailRecipientsAddCommand. -
Moving to the next step, facilitated by
EmailRecipientsNextCommand.
-
-
Choosing your contents, facilitated by
EmailContentsCommand. Within which exists the following sub-stages:-
Adding contents, facilitated by
EmailContentsAddCommand. -
Moving back to the previous step, facilitated by
EmailContentsBackCommand. -
Moving to the next step, facilitated by
EmailContentsNextCommand.
-
-
Sending your email, facilitated by
EmailSendCommand. Within which exists the following sub-stages:-
Moving back to the previous step, facilitated by
EmailSendBackCommand. -
Previewing your email, facilitated by
EmailSendPreviewCommand. -
Sending the email, facilitated by
EmailSendSendCommand.
-
As you can see, the email command is quite complicated, so in order to explain how it works, given below is an example usage scenario of how the email command behaves at each step.
-
You launch the application. The application loads email settings from
preferences.jsonwhich is stored inModel#EmailUtil. -
You execute the
emailcommand. A newEmailUtilobject is constructed and replaces theEmailUtilobject inModelusingmodel#resetEmailUtil.LogicStateis changed to reflect initialisation of the email command, moving theLogicStateto recipients selection state. -
You use
listc,findc,filterc,listC,findC,findj,filterCandfilterjto filter out who you wish to send the email to. -
You execute the
addcommand for the first time. This callsEmailRecipientsAddCommand.-
The add command first checks if there are recipients to add with
EmailRecipientsAddCommand#addCandidates or #addJobOffers. If there is nothing to add, an error message will be displayed. If there are objects to add, then the following steps will be executed. -
EmailUtil#hasRecipientsAddedboolean value is changed to true to indicate that there are recipients added. -
MainWindow#getCurrentBook()is called to return which book you are on andEmailUtil#areRecipientsCandidatesboolean value is changed accordingly:-
If recipients are candidates,
EmailUtil#areRecipientsCandidateswill be true. -
If recipients are companies,
EmailUtil#areRecipientsCandidateswill be false.
-
-
Depending on
EmailUtil#areRecipientsCandidates, the recipient objects are called withModel#getFilteredCandidateListorModel#getFilteredJobListand are stored in a linked hash set withinEmailUtilto prevent duplicates and to preserve insertion order.
Using theLinkedHashSet#add()boolean return value, it is possible to determine if object added is a duplicate. Duplicates are not added and are noted down inside anArrayListwithinEmailRecipientsAddCommandwhich will be reflected back to the user.
-
-
You then use
listc,findcandfiltercorlistC,findC,findj,filterCandfilterjto filter out more recipients. -
You execute another
addcommand to add more recipients. This callsEmailRecipientsAddCommand-
If
MainWindow#getCurrentBook()andEmailUtil#areRecipientsCandidatesdo not match, for example, ifMainWindow#getCurrentBook()returnscompanyBook, andemailUtil#areRecipientsCandidatesistrue, you will be notified with an error message because you have already added candidates as recipients, and you should not be allowed to add job offers. -
If
MainWindow#getCurrentBook()andEmailUtil#areRecipientsCandidatesmatch, recipients are added as per normal, as seen above. -
If there are duplicate recipients, RecruitBook will inform you about them and they will not be added.
-
-
You have added your recipients. So now you wish to move on to the next step, so you execute the
nextcommand. This callsEmailRecipientsNextCommandwhich based onEmailUtil#areRecipientsCandidates, which switches the current book and changesLogicStateto select contents phase.In EmailContentSelectionCommandphase, depending onEmailUtil#areRecipientsCandidates, the book displayed will be locked and only commands pertaining to the current book can be used. This is to enforce that recipients and contents are either candidates and job offers or job offers and candidates. -
You use
listc,findcandfiltercorlistC,findC,findj,filterCandfilterjto filter out the contents of the email. -
You then execute the
addcommand. This callsEmailContentsAddCommandwhich adds contents in the same manner asEmailRecipientsAddCommandas seen above. Having no contents to be added and duplicates will be caught and reflected back to you in the form of an error. -
You execute
nextcommand to move on to the confirmation step. This callsEmailContentsNextCommandwhich changesLogicStateto the send phase. -
In order to double check if you have picked the correct recipients and contents, you execute the
previewcommand. This callsEmailSendPreviewCommand.-
This generates a string of the email based on recipients and contents in
EmailUtilwhich callsEventCenterto postShowEmailPreviewEventwith the email String and shows the string in a new window,EmailPreview. -
The string is generated differently, depending if your recipients are candidates or companies.
-
If your recipients are candidates, then the
Tofield of the email will contain all the recipients. -
If your recipients are job offers, then the job offers are paired with its company, and each company will have its own
Tofield, to show that an email will be sent individually to each company.
For example, if I am sending an email toAppleregarding a job offer onCashierandCleaner, andDBSregarding a job offer onCafe Waiter, there will be 2Tofields that look like this:-
To: Apple(apple@example.com) regarding job offers: [Cashier, Cleaner] -
To: DBS(dbs@example.com) regarding job offer: [Cafe Waiter]
-
-
-
-
You are satisfied with the preview and execute the
sendcommand to send the email. This generates the email as aMimeMessagewhich is the Java format used for emails and is sent viaEmailUtil#sendMessage.-
If recipients are candidates, one email will be sent to all candidates with their emails sent under the
BCCfield to prevent recipients from seeing each other’s emails, which preserves privacy of the candidates. -
If recipients are companies, one email will be sent per company detailing the specific job offer(s) that you have added during the selection of recipients.
-
-
LogicStateis then reset back to original and this marks the end of the email command.
This is the simplified action diagram and sequence diagram when one executes the email command, assuming that the add command is used once per selectRecipients and selectContents step.

3.9.2. Design Considerations
Aspect: Data structure to store recipients and contents
-
Alternative 1: Array List
-
Pros: General purpose data structure that will work for this use case
-
Cons: Checking for duplicates is not efficient. Each insertion requires a comparison across all elements in the array.
-
-
Alternative 2: Hash Set
-
Pros: Does not allow duplicates and indicates if an object being added is successful or not.
-
Cons: Does not maintain the order in which objects were added in.
-
-
Alternative 3 (current choice): Linked Hash Set
-
Pros: Does not allow duplicates, indicates if an object being added is successful or not, and maintains order in which objects were added in.
-
Cons: Not as fast as a hash set, but speed can be sacrificed for the benefits.
-
Aspect: The design choice of the Email command
-
Alternative 1: Having a pop up Email window with editable fields
-
Pros: More customisable, more intuitive and looks better
-
Cons: Very labour intensive to email many people. Adding candidates manually will take a very long time, even if the GUI can be used to assist.
-
-
Alternative 2 (current choice): Using command line to mass add recipients and contents
-
Pros: Very suitable for mass sending applications, which was the main design consideration when designing the email command.
-
Cons: Not very customisable, but we will try to add more customisability down the road.
-
3.10. Undo/Redo feature
3.10.1. Current Implementation
CandidateBook
The undo/redo mechanism for changes made to RecruitBook is facilitated by VersionedRecruitBook.
It extends RecruitBook with an undo/redo history, stored internally as a recruitBookStateList and currentStatePointer.
Additionally, it implements the following operations:
-
VersionedRecruitBook#commit()— Saves the current RecruitBook state in its history. -
VersionedRecruitBook#undo()— Restores the previous RecruitBook state from its history. -
VersionedRecruiteBook#redo()— Restores a previously undone RecruitBook state from its history.
These operations are exposed in the Model interface as Model#commitRecruitBook(), Model#UndoRecruitBook() and Model#redoRecruitBook() respectively.
Given below is an example usage scenario and how the undo/redo mechanism behaves at each step.
Step 1. The user launches the application for the first time. The VersionedRecruitBook will be initialized with the initial RecruitBook state, and the currentStatePointer pointing to that single RecruitBook state.

Step 2. The user executes deletec 5 command to delete the 5th candidate in RecruitBook. The deletec command calls Model#commitRecruitBook(), causing the modified state of the RecruitBook after the deletec 5 command executes to be saved in the recruitBookStateList, and the currentStatePointer is shifted to the newly inserted RecruitBook state.

Step 3. The user executes addc then n/David … to add a new candidate. The addc command also calls Model#commitRecruitBook(), causing another modified RecruitBook state to be saved into the recruitBookStateList.

If a command fails its execution, it will not call Model#commitRecruitBook(), so the RecruitBook state will not be saved into the recruitBookStateList.
|
Step 4. The user now decides that adding the candidate was a mistake, and decides to undo that action by executing the undo command. The undo command will call Model#undoRecruitBook(), which will shift the currentStatePointer once to the left, pointing it to the previous RecruitBook state, and restores the RecruitBook to that state.
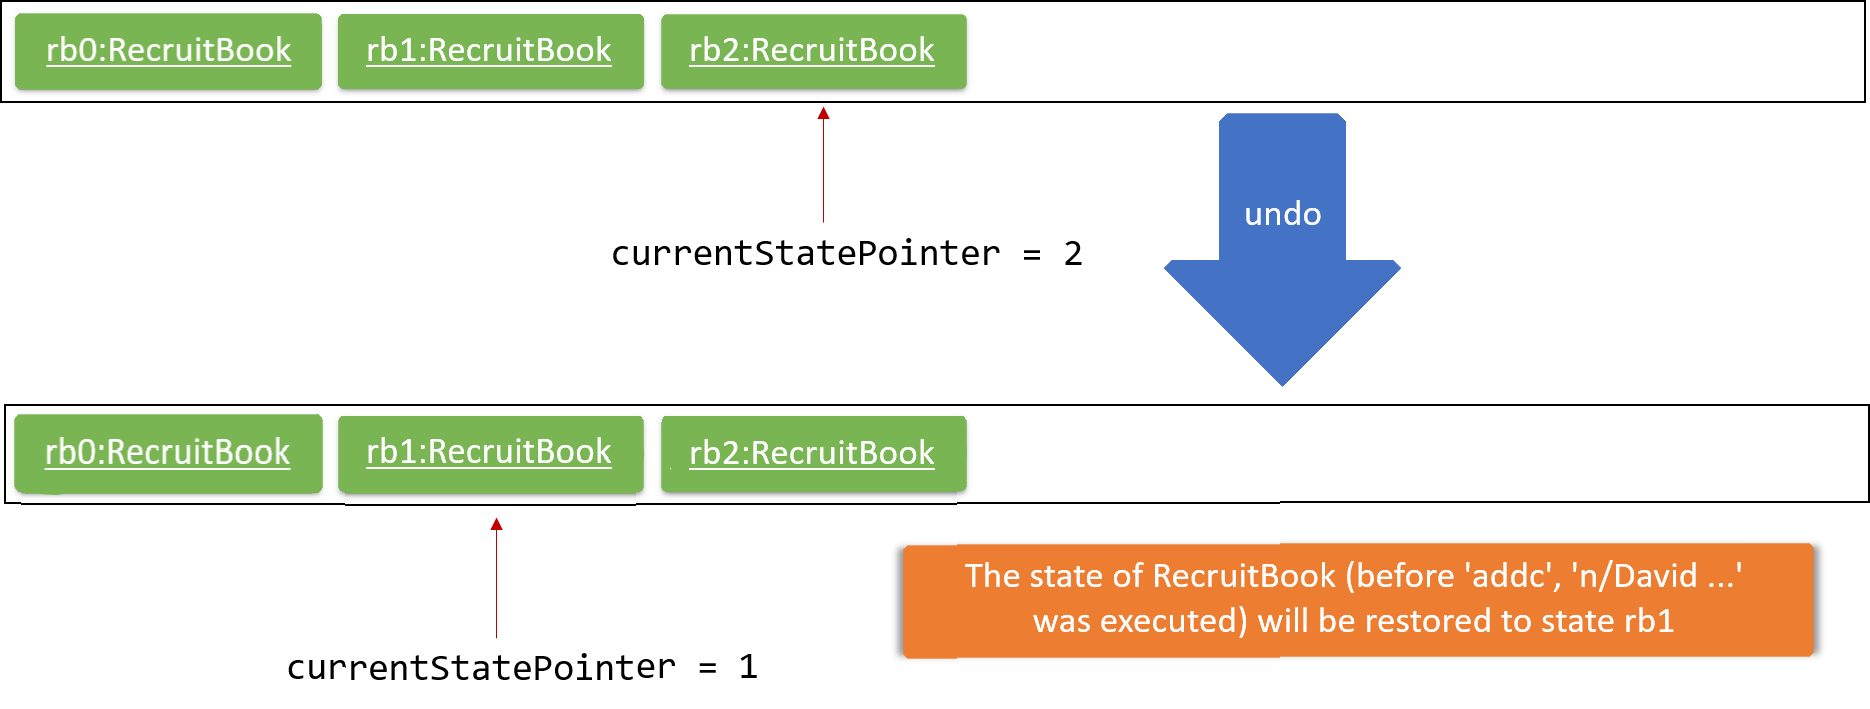
If the currentStatePointer is at index 0, pointing to the initial RecruitBook state, then there are no previous RecruitBook states to restore. The undo command uses Model#canUndoRecruitBook() to check if this is the case. If so, it will return an error to the user rather than attempting to perform the undo.
|
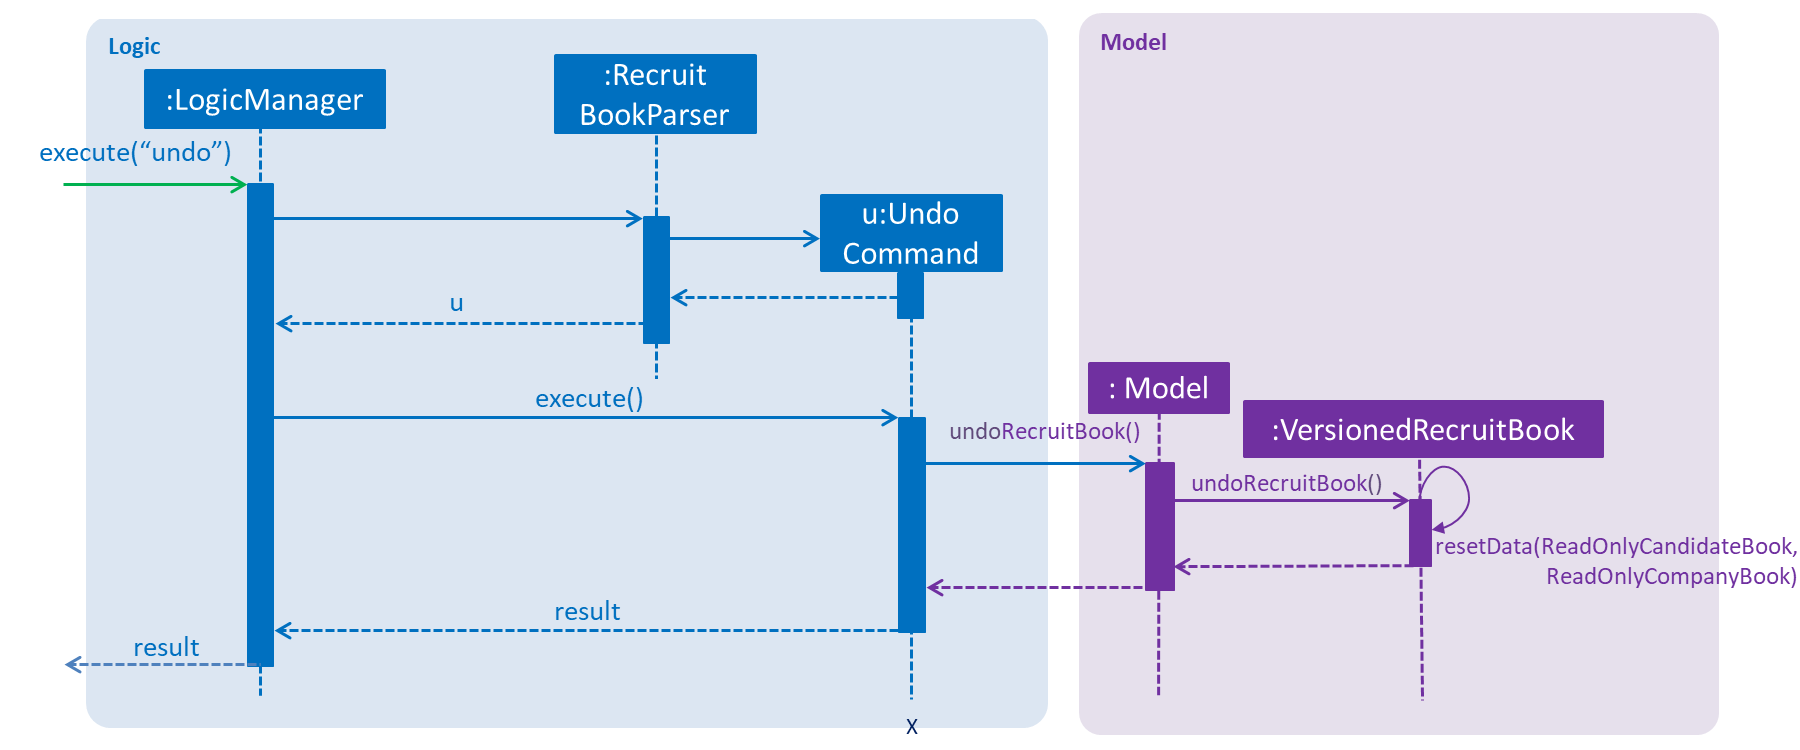
The following sequence diagram shows how the undo operation works:
The redo command does the opposite — it calls Model#redoRecruitBook(), which shifts the currentStatePointer once to the right, pointing to the previously undone state, and restores the RecruitBook to that state.
If the currentStatePointer is at index recruitBookStateList.size() - 1, pointing to the latest RecruitBook state, then there are no undone RecruitBook states to restore. The redo command uses Model#canRedoRecruitBook() to check if this is the case. If so, it will return an error to the user rather than attempting to perform the redo.
|
Step 5. The user then decides to execute the command listc. Commands that do not modify RecruitBook state, such as listc or listC, will usually not call Model#commitRecruitBook(), Model#undoRecruitBook() or Model#redoRecruitBook(). Thus, the recruitBookStateList remains unchanged.

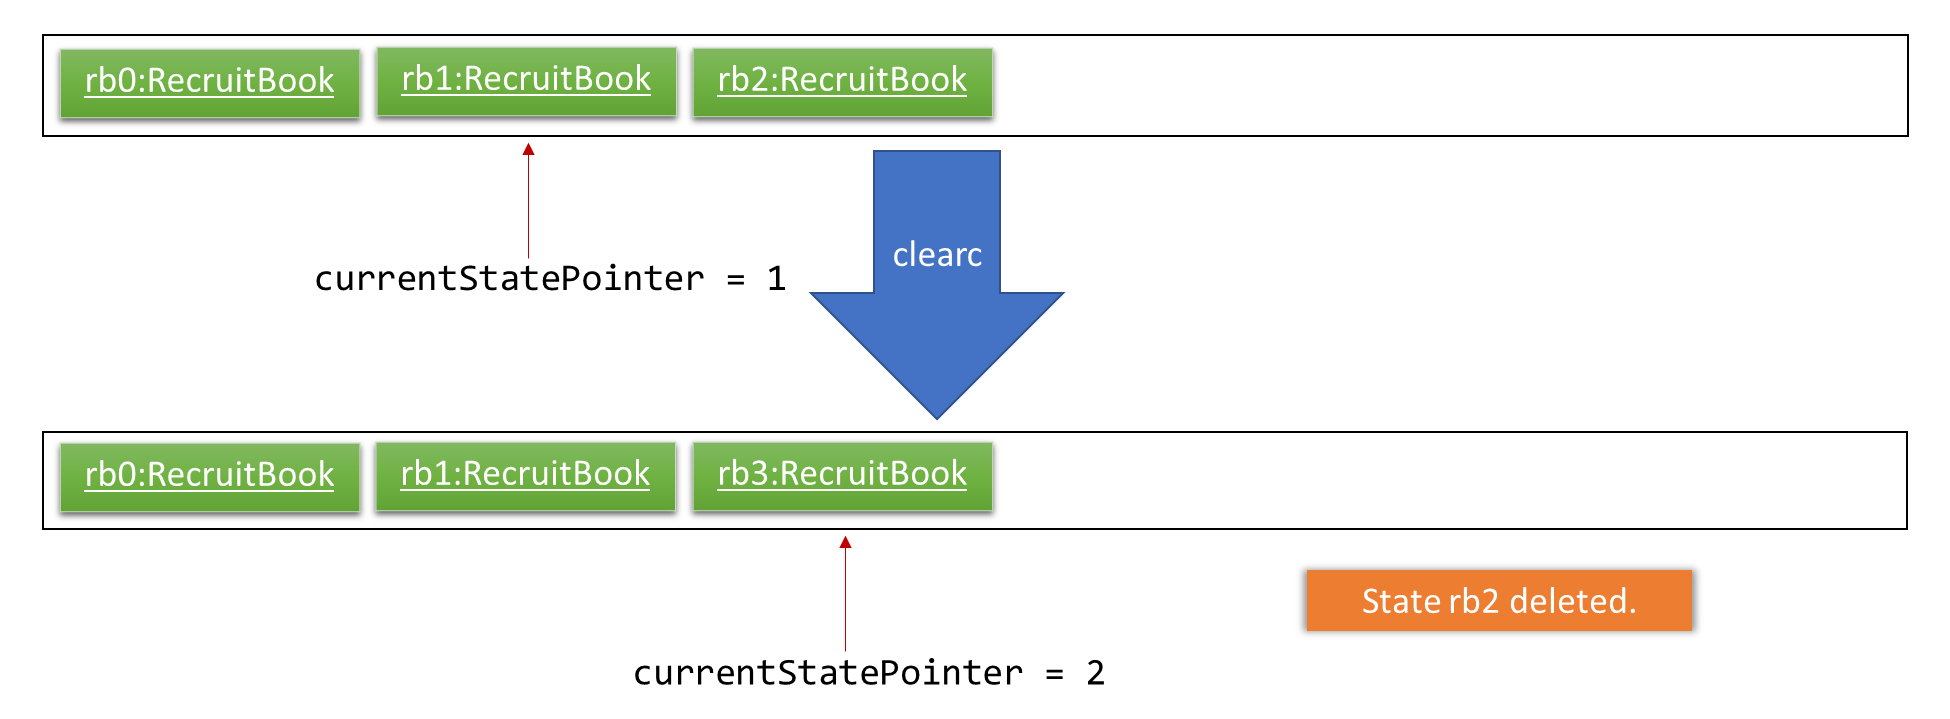
Step 6. The user executes clearc, which calls Model#commitRecruitBook(). Since the currentStatePointer is not pointing at the end of the recruitBookStateList, all RecruitBook states after the currentStatePointer will be purged. We designed it this way because it no longer makes sense to redo the n/David … command. This is the behavior that most modern desktop applications follow.
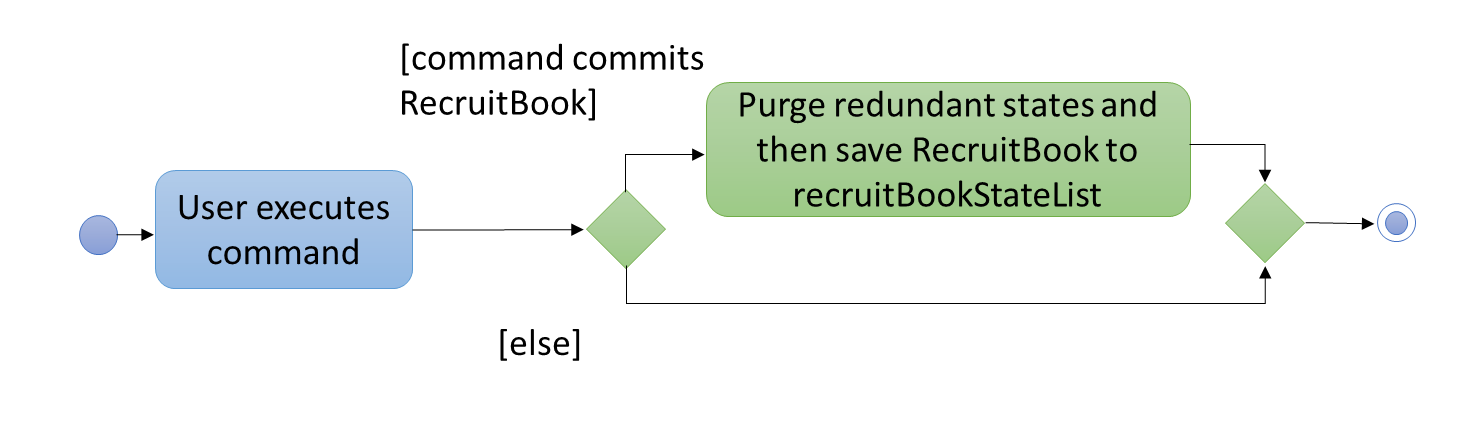
The following activity diagram summarizes what happens when a user executes a new command:
3.10.2. Design Considerations
Aspect: How undo & redo executes
-
Alternative 1 (current choice): Saves the entire RecruitBook.
-
Pros: Easy to implement.
-
Cons: May have performance issues in terms of memory usage.
-
-
Alternative 2: Individual command knows how to undo/redo by itself.
-
Pros: Will use less memory (e.g. for
delete, just save the candidate being deleted). -
Cons: We must ensure that the implementation of each individual command are correct.
-
Aspect: Data structure to support the undo/redo commands
-
Alternative 1 (current choice): Use a list to store the history of RecruitBook states.
-
Pros: Easy for new Computer Science student undergraduates to understand, who are likely to be the new incoming developers of our project.
-
Cons: Logic is duplicated twice. For example, when a new command is executed, we must remember to update both
HistoryManagerandVersionedRecruitBook.
-
-
Alternative 2: Use
HistoryManagerfor undo/redo-
Pros: We do not need to maintain a separate list, and just reuse what is already in the codebase.
-
Cons: Requires dealing with commands that have already been undone: We must remember to skip these commands. Violates Single Responsibility Principle and Separation of Concerns as
HistoryManagernow needs to do two different things.
-
3.11. Logging
We are using java.util.logging package for logging. The LogsCenter class is used to manage the logging levels and logging destinations.
-
The logging level can be controlled using the
logLevelsetting in the configuration file (See Section 3.12, “Configuration”) -
The
Loggerfor a class can be obtained usingLogsCenter.getLogger(Class)which will log messages according to the specified logging level -
Currently log messages are output through:
Consoleand to a.logfile.
Logging Levels
-
SEVERE: Critical problem detected which may possibly cause the termination of the application -
WARNING: Can continue, but with caution -
INFO: Information showing the noteworthy actions by the App -
FINE: Details that is not usually noteworthy but may be useful in debugging e.g. print the actual list instead of just its size
3.12. Configuration
Certain properties of the application can be controlled (e.g App name, logging level) through the configuration file (default: config.json).
4. Testing
4.1. Running Tests
There are three ways to run tests.
| The most reliable way to run tests is the 3rd one. The first two methods might fail some GUI tests due to platform/resolution-specific idiosyncrasies. |
Method 1: Using IntelliJ JUnit test runner
-
To run all tests, right-click on the
src/test/javafolder and chooseRun 'All Tests' -
To run a subset of tests, you can right-click on a test package, test class, or a test and choose
Run 'ABC'
Method 2: Using Gradle
-
Open a console and run the command
gradlew clean allTests(Mac/Linux:./gradlew clean allTests)
| See UsingGradle.adoc for more info on how to run tests using Gradle. |
Method 3: Using Gradle (headless)
Thanks to the TestFX library we use, our GUI tests can be run in the headless mode. In the headless mode, GUI tests do not show up on the screen. That means the developer can do other things on the Computer while the tests are running.
To run tests in headless mode, open a console and run the command gradlew clean headless allTests (Mac/Linux: ./gradlew clean headless allTests)
4.2. Types of tests
We have two types of tests:
-
GUI Tests - These are tests involving the GUI. They include,
-
System Tests that test the entire App by simulating user actions on the GUI. These are in the
systemtestspackage. -
Unit tests that test the individual components. These are in
seedu.recruit.uipackage.
-
-
Non-GUI Tests - These are tests not involving the GUI. They include,
-
Unit tests targeting the lowest level methods/classes.
e.g.seedu.recruit.commons.StringUtilTest -
Integration tests that are checking the integration of multiple code units (those code units are assumed to be working).
e.g.seedu.recruit.storage.StorageManagerTest -
Hybrids of unit and integration tests. These test are checking multiple code units as well as how the are connected together.
e.g.seedu.recruit.logic.LogicManagerTest
-
4.3. Troubleshooting Testing
Problem: HelpWindowTest fails with a NullPointerException.
-
Reason: One of its dependencies,
HelpWindow.htmlinsrc/main/resources/docsis missing. -
Solution: Execute Gradle task
processResources.
5. Dev Ops
5.1. Build Automation
See UsingGradle.adoc to learn how to use Gradle for build automation.
5.2. Continuous Integration
We use Travis CI and AppVeyor to perform Continuous Integration on our projects. See UsingTravis.adoc and UsingAppVeyor.adoc for more details.
5.3. Coverage Reporting
We use Coveralls to track the code coverage of our projects. See UsingCoveralls.adoc for more details.
5.4. Documentation Previews
When a pull request has changes to asciidoc files, you can use Netlify to see a preview of how the HTML version of those asciidoc files will look like when the pull request is merged. See UsingNetlify.adoc for more details.
5.5. Making a Release
Here are the steps to create a new release.
-
Update the version number in
MainApp.java. -
Generate a JAR file using Gradle.
-
Tag the repo with the version number. e.g.
v0.1 -
Create a new release using GitHub and upload the JAR file you created.
5.6. Managing Dependencies
A project often depends on third-party libraries. For example, candidate book depends on the Jackson library for XML parsing. Managing these dependencies can be automated using Gradle. For example, Gradle can download the dependencies automatically, which is better than these alternatives.
a. Include those libraries in the repo (this bloats the repo size)
b. Require developers to download those libraries manually (this creates extra work for developers)
6. Product Scope
Target user profile: Job Agents, Recruit executives, Human Resources executives
-
has a need to manage a significant number of contacts and job offers
-
prefer desktop apps over other types
-
can type fast
-
prefers typing over mouse input
-
is reasonably comfortable using CLI apps
Value proposition: manage contacts faster than a typical mouse/GUI driven app
Appendix A: User Stories
Priorities: High (must have) - * * *, Medium (nice to have) - * *, Low (unlikely to have) - *
| Priority | As a … | I want to … | So that I can… |
|---|---|---|---|
|
New user |
See usage instructions |
Refer to instructions when I forget how to use the App |
|
User |
Add a new candidate |
|
|
User |
Add a new company |
|
|
User |
Add a new job offer to a company |
|
|
User |
Delete a candidate |
Remove entries that I no longer need |
|
User |
Delete a company |
Remove entries that I no longer need |
|
User |
Delete a job offer |
Remove entries that I no longer need |
|
User |
Find a candidate by name |
Locate details of candidates without having to go through the entire list |
|
User |
List offers and employees |
Access these information readily |
|
User |
List job offers based on urgency |
Prioritize job offers to fulfill |
|
User |
Email job candidates |
Reach out to job seekers regarding relevant job offers |
|
User |
Filter a list of candidates based on certain criteria |
See relevant candidates based on the criteria |
|
User |
Blacklist problematic candidates |
Avoid assigning undesirable candidates to job |
|
User |
Sort jobs of different nature (such as internships, part-time jobs) |
There are more options for employees to choose. |
|
User |
Find relevant details to a specific job candidate |
Assign the most suitable job to the candidate. |
|
User |
Ensure data integrity and confidentiality of candidates and job offers |
Protect the privacy rights of stakeholders |
|
User |
Undo/Redo changes to CompanyBook and CandidateBook |
Revert unwanted changes job candidates and offers |
|
User |
See the undone/redone command |
Be aware of the undo/redo changes made to RecruitBook |
|
User |
Hide private contact details by default |
Minimize chance of someone else seeing them by accident |
|
User |
Add relevant job experience/history of candidate |
Useful when recommending candidates for jobs requiring relevant experience |
|
User |
Shortlist the best candidates for a specific job offer |
See the best available candidates |
|
User |
Share profiles of prospective candidates with employers |
Recommend employees to the respective companies |
|
User |
Edit the details of listed candidates |
Update changes of the details |
|
User |
List the best employees for each sector |
I can recommend them to potential employers |
|
User with many candidates in the candidate book |
Sort candidates by name |
Locate a candidate easily |
{More to be added}
Appendix B: Use Cases
(For all use cases below, the System is the RecruitBook and the Actor is the user, unless specified otherwise)
Use case: Add Candidate MSS 1. User requests to add a candidate 2. RecruitBook prompts user to enter relevant details of job candidate 3. User enters the relevant details 4. RecruitBook prompts user to enter relevant job experience of job candidate 5. User enters the relevant details + Use case ends. Extensions 3a. User enters invalid details or used the wrong format. 3a1. RecruitBook informs user which fields they entered wrongly and show relevant examples 3a2. Prompts user to reenter fields in correct format or to exit add command + Use case resumes at step 3. 3b. User enters a duplicate entry. 3b1. RecruitBook informs user of existing entry 3b2. Prompts user to enter a new entry or to exit add command + Use case resumes at step 3. |
Use case: Add Job Offer MSS 1. User requests to add a job offer 2. RecruitBook prompts user to enter relevant details of job offer 3. User enters the relevant details 4. RecruitBook prompts user to enter job requirements 5. User enters the relevant details + Use case ends. Extensions 3a. User enters invalid details or used the wrong format. 3a1. RecruitBook informs user which fields they entered wrongly and show relevant examples + Use case resumes at step 3. 3a. User enters a duplicate entry 3a1. RecruitBook informs user of existing entry + Use case resumes at step 3. |
Use case: Add Company MSS 1. User requests to add a company 2. RecruitBook adds company to CompanyBook + Use case ends. Extensions 1a. User enters invalid details or used the wrong format. 1a1. RecruitBook informs user which fields they entered wrongly and show relevant examples 1a2. Prompts user to re-enter fields in correct format or to exit add command + Use case resumes at step 1. 1b. User enters a duplicate entry 1b1. RecruitBook informs user of existing entry 1b2. Prompts user to enter a new entry or to exit add command + Use case resumes at step 1. |
Use case: List All Candidates MSS 1. User requests to list all candidates. 2. RecruitBook displays a list of all candidates. + Use case ends. Extensions 2a. The list is empty. + Use case ends. |
Use case: List all Companies and all Job Offers MSS 1. User requests to list all companies and all job offers. 2. RecruitBook displays a list of all companies and all jobs. + Use case ends. Extensions 2a. The company list is empty. 2b. The job offer list is empty. 2c. Both lists are empty. + Use case ends. |
Use case: Switch Book View MSS 1. User requests to switch view. 2. RecruitBook displays the other book. + Use case ends. Extensions 2a. The other book is empty. + Use case ends. |
Use case: Shortlist Candidate MSS 1. User requests to shortlist a candidate. 2. RecruitBook displays the shortlist panel view. 3. RecruitBook requests for the company’s index. 4. User enters the index of the company of her choice. 5. RecruitBook requests for the job offer’s index. 6. User enters the index of the job offer of her choice. 7. RecruitBook requests for the index of the candidate to shortlist. 8. User enters the index of the candidate of her choice. 9. RecruitBook requests for confirmation. 10. User confirms. + Use case ends. Extensions 4a. The index of company to select is invalid. 4a1. RecruitBook displays an error message. 4a2. RecruitBook requests for a valid index. 4a3. User enters new index. Steps 4a1-4a3 are repeated until the index entered is valid. + Use case resumes from Step 5. 6a. The index of job offer to select is invalid. 6a1. RecruitBook displays an error message. 6a2. RecruitBook requests for a valid index. 6a3. User enters new index. Steps 6a1-6a3 are repeated until the index entered is valid. + Use case resumes from Step 7. 8a. The index of candidate to select is invalid. 8a1. RecruitBook displays an error message. 8a2. RecruitBook requests for a valid index. 8a3. User enters new index. Steps 8a1-8a3 are repeated until the index entered is valid. + Use case resumes from Step 9. a. At any time, user chooses to cancel the shortlisting process. a1. RecruitBook cancels the shortlisting process. + Use case ends. |
Use case: Edit Candidate MSS 1. User requests to edit details of a candidate based on the candidate’s index 2. RecruitBook displays successful edit message + Use case ends. Extensions 1a. The index of candidate to edit is invalid 1a1. RecruitBook displays an error message + Use case ends. 1b. The tags to edit are invalid 1b1. RecruitBook displays an error message + Use case ends. 1c. No fields are entered for editing 1c1. RecruitBook displays an error message + Use case ends. |
Use case: Edit Job Offer MSS 1. User requests to edit a job offer 2. RecruitBook displays successful edit message + Use case ends. Extensions 1a. The list is empty. + Use case ends. 1b. The index number requested for edit is invalid 1b1. RecruitBook displays an error message + Use case ends. 1c. The tags to edit are invalid 1c1. RecruitBook displays an error message + Use case ends. 1d. No fields are entered for editing 1d1. RecruitBook displays an error message + Use case ends. |
Use case: Find Candidate MSS 1. User requests to find a candidate based on a keyword of their attributes (name/email/phone number/address) 2. RecruitBook lists out people whose keyword matches the attribute criteria + Use case ends. Extensions 2a. Filter tag is invalid 2a1. RecruitBook informs the user of the tag error 2a2. If there is only one tag in the search request and it is invalid 2a2.1. Inform the user of the invalid filter tag, do not search anything + Use case ends 2a3. If there are other valid tags in the search request as well 2a3.1. Inform the user of the invalid filter tag, ignore the invalid filter tag, but still search based on the valid filter tags 2a3.2. List out people whose keyword matches the criteria + Use case ends 2b. No candidates matches with the find criteria 2b1. Inform the user that no users have been matched with the search criteria. + Use case ends. |
Use case: Filter Candidate MSS 1. User requests the details of the candidates to sorted by a specified tag 2. RecruitBook shows all the names of the candidates that fit into the searched criteria + Use case ends. Extensions 1a. The filter tag is invalid 1a1. RecruitBook informs user of the error and show the specified tags that the filter function supports together with examples 1a2. RecruitBook then prompts user to re-enter fields that is supported or to exit filter command 1b. The searched field is invalid 1a1. RecruitBook informs user of the error and shows the specified fields that is currently being recorded in the system + Use case resumes at step 1. |
Use case: Delete Candidate MSS 1. User requests to delete a candidate 2. RecruitBook prompts user to enter the index of candidate to be deleted 3. User enters index of candidate from the list 4. RecruitBook displays message that name of candidate is successfully deleted + Use case ends. Extensions 3a. User enters invalid format or details 3a1. RecruitBook informs user which fields they entered wrongly and show relevant examples 3a2. RecruitBook prompts user to re-enter fields in correct format or to exit delete command + Use case resumes at step 3. |
Use case: Delete Job Offer MSS 1. User requests to delete a job offer 2. RecruitBook lists all the job offers available together with the index number of the job offer 3. User proceeds to delete the index of the job offer that is to be deleted 4. RecruitBook displays message that the job offer is successfully deleted + Use case ends. Extensions 3a. User enters invalid format or details 3a1. RecruitBook informs user which fields they entered wrongly and show relevant examples 3a2. RecruitBook prompts user to re-enter fields in correct format or to exit delete command + Use case resumes at step 3. |
{More to be added} |
Appendix C: Non Functional Requirements
-
Should work on any mainstream OS as long as it has Java
9or higher installed. -
Should be able to hold up to 1000 candidates without a noticeable sluggishness in performance for typical usage.
-
A user with above average typing speed for regular English text (i.e. not code, not system admin commands) should be able to accomplish most of the tasks faster using commands than using the mouse.
{More to be added}
Appendix E: Product Survey
Product Name
Author: …
Pros:
-
…
-
…
Cons:
-
…
-
…
Appendix F: Instructions for Manual Testing
Given below are instructions to test the app manually.
| These instructions only provide a starting point for testers to work on; testers are expected to do more exploratory testing. |
F.1. Launch and Shutdown
-
Initial launch
-
Download the jar file and copy into an empty folder
-
Double-click the jar file
Expected: Shows the GUI with a set of sample contacts. The window size may not be optimum.
-
-
Saving window preferences
-
Resize the window to an optimum size. Move the window to a different location. Close the window.
-
Re-launch the app by double-clicking the jar file.
Expected: The most recent window size and location is retained.
-
{ more test cases … }
F.2. Deleting a candidate
-
Deleting a candidate while all candidates are listed
-
Prerequisites: List all candidates using the
listcommand. Multiple candidates in the list. -
Test case:
deletec 1
Expected: First contact is deleted from the list. Details of the deleted contact shown in the status message. Timestamp in the status bar is updated. -
Test case:
deletec 0
Expected: No candidate is deleted. Error details shown in the status message. Status bar remains the same. -
Other incorrect delete commands to try:
delete,delete x(where x is larger than the list size) {give more}
Expected: Similar to previous.
-
{ more test cases … }
F.3. Saving data
-
Dealing with missing/corrupted data files
-
{explain how to simulate a missing/corrupted file and the expected behavior}
-
{ more test cases … }