By: Team F09-4 Since: Sept 2018 Licence: MIT
- 1. Introduction
- 2. About
- 3. Quick Start
- 4. Features
- 4.1. Viewing help :
help - 4.2. Switching Books :
switch - 4.3. Adding a candidate / company / job :
addcaddCaddj - 4.4. Finding candidates / companies / job offers :
findcfindCfindj - 4.5. Filter candidates / companies / job offers :
filtercfilterCfilterj - 4.6. Editing a candidate / company / job :
editceditCeditj - 4.7. Deleting candidates / companies / job offers :
delete - 4.8. Deleting a shortlisted candidate:
deleteShortlist - 4.9. Listing details of candidates / companies / jobs:
listclistC - 4.10. Selecting a candidate / company / job offer:
selectcselectCselectj - 4.11. Sorting candidates / company / job :
sortcsortCsortj - 4.12. Blacklisting candidates :
blacklistblacklist rm - 4.13. Shortlisting candidates for a job offer :
shortlist - 4.14. Sending emails :
email - 4.15. Setting a password :
setPW - 4.16. Undo/Redo changes to entries :
undoredo - 4.17. Clearing all entries :
clearcclearC - 4.18. Exiting from any intermediate command:
cancel - 4.19. Exiting the program :
exit - 4.20. Saving the data
- 4.21. Encrypting data files
[coming in v2.0]
- 4.1. Viewing help :
- 5. FAQ
- 6. Command Summary
1. Introduction
Welcome to RecruitBook User Guide!
RecruitBook v1.4 is an offline desktop application that allows you to manage job candidates and job offers throughout the process of recruiting. Designed specifically to ease the recruitment process, you can use RecruitBook to add, edit, find, filter, shortlist, email and delete candidates, as well as job offers, to help you efficiently link potential candidates to the job offer that is best suited for them.
RecruitBook is optimized for people who prefer to work with a Command Line Interface (CLI), while enjoying the benefits of a Graphical User Interface (GUI). RecruitBook can get your contact management tasks done faster than traditional GUI apps.
RecruitBook is available for the Linux, Unix, Windows XP, and Mac OS X operating systems.
2. About
This user guide provides in-depth documentation on the RecruitBook installation process, the step-by-step instructions for its features, and Frequently Asked Questions (FAQ). In addition, Section 3, “Quick Start” provides an end-to-end setup process to get you started.
In order to understand the step-by-step instructions, it is important to know the difference between Command Line Interface (CLI) and Graphical User Interface (GUI).
Command Line Interface (CLI) |
Entering commands via keyboard input into the command box. |
Graphical User Interface (GUI) |
Clicking on-screen via mouse input. |
3. Quick Start
-
Ensure you have Java version
9or later installed in your Computer. -
Download the latest
recruitbook.jarhere. -
Copy the file to the folder you want to use as the home folder for your Recruit Book.
-
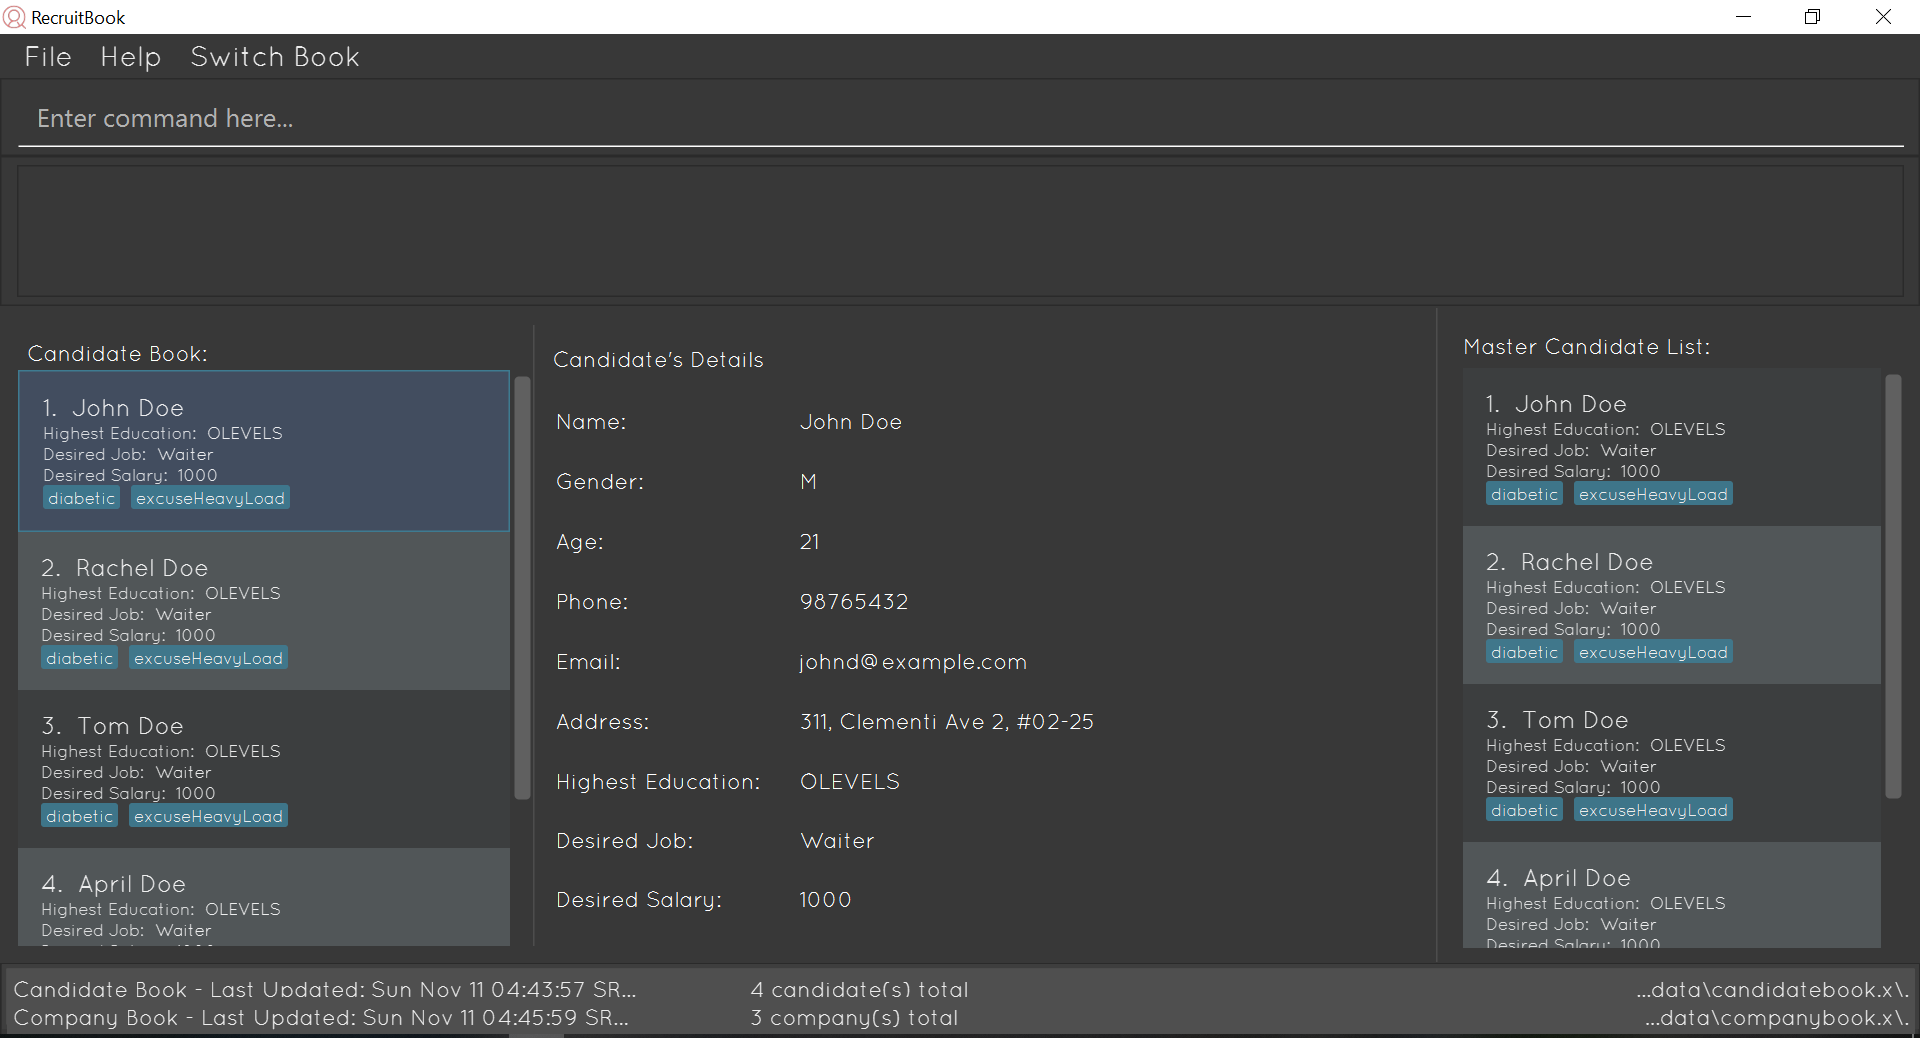
Double-click the file to start the app. The GUI (as shown in Figure 1) should appear in a few seconds.
RecruitBook opens Candidate Book by default.
-
Type a command in the command box and press Enter to execute it.
e.g. typinghelpand pressing Enter will open the help window. -
Some example commands you can try:
-
switch: switches the view from one book to another -
listc: lists the summary of all the candidates -
addc: adds a job candidate to RecruitBook -
addj: adds an available job to RecruitBook -
deleteC3: deletes the 3rd company shown in the list of companies -
exit: exits the app
-
-
Refer to Section 4, “Features” for details of each command.
4. Features
Before you get started on the features, there is a certain command format that RecruitBook follows.
Command Format
-
Words in
UPPER_CASEare the fields to be specified by you.In addc n/NAME,NAMEis a parameter which can be used asaddc n/John Doe. -
Details labelled with “if any” must be filled in at least with
NAif you find it not applicable. -
Parameters can be in any order.
If the command specifies n/NAME p/PHONE_NUMBER,p/PHONE_NUMBER n/NAMEis also acceptable.
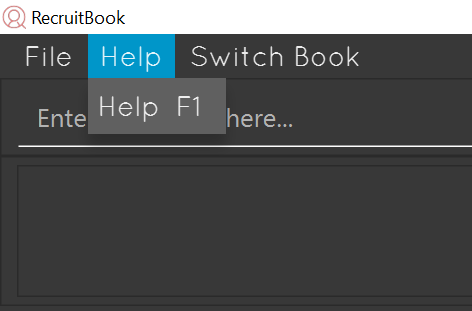
4.1. Viewing help : help
Views help information of the various commands in RecruitBook.
-
Format in CLI:
helpor press F1 -
GUI (refer to Figure 2) : At the top of the application, locate the menu bar and click
Help>Help F1.
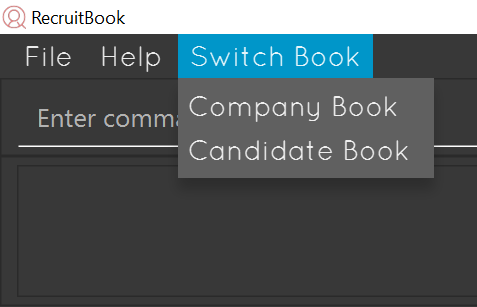
4.2. Switching Books : switch
Toggles between Candidate Book and Company Book according to your viewing needs.
You do not need to specify which book to switch to because RecruitBook automatically detects which book you are looking at,
and does the switch to the other book for you when you enter the switch command.
|
-
Format in CLI:
switch -
GUI (refer to Figure 3) : At the top of the application, locate the menu bar and click
Switch Book>Candidate BookorCompany Book.
4.3. Adding a candidate / company / job : addc addC addj
4.3.1. Adds a candidate to the RecruitBook
Format: addc
Supported tags: n/, g/, x/ p/, e/, j/, h/, s/, t/
To start adding candidates in RecruitBook, enter addc in the command line to the start the Add Candidate Interface.
After entering addc you will be prompted the following:
|
You are now inside the Add Candidate Interface!
You can now keep adding candidates by specifying the required fields n/NAME g/GENDER x/AGE p/PHONE_NUMBER e/EMAIL a/ADDRESS j/SEEKING_JOB h/HIGHEST_EDUCATION s/EXPECTED_SALARY_PER_MONTH.
Below are some examples for your reference.
To stop adding candidates and exit from the Add Candidate Interface, enter cancel.
Examples:
-
n/Susy Roe g/M x/18 p/91238123 e/susyroe@example.com a/123, Central Boulevard, #01-111, 600123 j/WAITER h/ALEVELS s/1200 t/dyslexic -
n/Mary Loe g/M x/18 p/82238123 e/maryloe@example.com a/113, South Boulevard, #01-111, 600123 j/WAITER h/OLEVELS s/1000 t/student
4.3.2. Adds a company to the RecruitBook
Format: addC
Supported tags: c/, a/, e/, p/
To start adding companies in RecruitBook, enter addC in the command line to the start the Add Company Interface.
After entering addC you will be prompted the following:
|
You are now inside the Add Company Interface!
You can now keep adding companies by specifying the required fields c/UNIQUE_COMPANY_NAME a/ADDRESS e/EMAIL p/PHONE.
Below are some examples for your reference.
To stop adding companies and exit from the Add Company Interface, enter cancel.
Examples:
-
c/Aviva a/101, Clementi Ave 2, #01-01 e/aviva@example.com p/61231232 -
c/Subway a/1 Create Way #01-02, NUS University Town e/subway@example.com p/61117111
4.3.3. Adds a job offer to the RecruitBook
Format: addj
Supported tags: c/, j/, g/, xr/, h/, s/
To start adding job offers in RecruitBook, enter addj in the command line to the start the Add Job Interface.
After entering addj you will be prompted the following:
|
Company with specified c/COMPANY_NAME has to be added to RecruitBook first!
|
You are now inside the Add Job Interface!
You can now keep adding job offers by specifying the required fields c/COMPANY_NAME j/JOB_TITLE g/GENDER xr/AGE_RANGE h/EDUCATION s/SALARY.
Below are some examples for your reference.
To stop adding job offers and exit from the Add Job Interface, enter cancel.
Examples:
-
c/Subway j/Cashier g/M xr/20-30 h/OLEVELS s/1200 -
c/KFC j/Cook g/F xr/20-30 h/OLEVELS s/1400
4.4. Finding candidates / companies / job offers : findc findC findj
Each find command is differentiated by the letter that comes right after the find word.
By using the find command, you can search for candidates/companies/job offers that contains any of the searched parameters.
Our app’s GUI provides two different views where the Candidate Book view and the Company Book view shows the details of all the candidates and companies respectively.
Entering commands in the other book will automatically switch your view to the correct book and still display the details of the results that you are searching for.
This note works for the below filter command as well:
4.4.1. Finds names of candidates from RecruitBook based on search fields that you have entered.
Format: findc <tag>/KEYWORD
Supported tags: n/NAME, p/PHONE, e/EMAIL, a/ADDRESS, x/AGE, h/HIGHEST EDUCATION, g/GENDER, j/JOB INTERESTED, s/EXPECTED SALARY), t/TAGS
Examples:
-
findc n/john
(Returns all candidates with the nameJohn) -
findc n/alice p/91234567
(Returns all candidates with the namealiceor candidates with phone number91234567)
4.4.2. Finds names of companies from RecruitBook based on searched fields that you have entered.
Format: findC <tag>/KEYWORD
Supported tags: c/COMPANY NAME, p/PHONE, e/EMAIL, a/ADDRESS
Examples:
-
findC n/HanBaoBao Pte Ltd a/Yishun MRT
(Returns all companies with the nameHanBaoBao Pte Ltdor with address saved asYishun MRT)
4.4.3. Finds job offers from RecruitBook based on searched fields that you have entered.
Format: findj <tag>/KEYWORD
Supported tags: c/COMPANY NAME, j/JOB OFFER, g/GENDER, s/SALARY, x/AGE, h/HIGHEST EDUCATION
Examples:
-
findj c/KFC x/18
(Returns all job offers either listed byKFCor job offers with age range that is suitable for the entered age)
4.5. Filter candidates / companies / job offers : filterc filterC filterj
Each filter command is differentiated by the letter that comes right after the filter word.
By using the filter command, you can search for candidates/companies/job offers that contains all of the searched parameters.
Our app’s GUI provides two different views where the Candidate Book view and the Company Book view shows the details of all the candidates and companies respectively.
Entering commands in the other book will automatically switch your view to the correct book and still display the details of the results that you are searching for.
4.5.1. Filters names of candidates from RecruitBook based on search fields that you have entered.
Format: filterc <tag>/KEYWORD
Supported tags: n/NAME, p/PHONE, e/EMAIL, a/ADDRESS, x/AGE, h/HIGHEST EDUCATION, g/GENDER, j/JOB INTERESTED, s/EXPECTED SALARY), t/TAGS
Examples:
-
filterc n/alice p/91234567
(Returns all candidates with the namealiceand phone number91234567)
4.5.2. Filters names of companies from RecruitBook based on searched fields that you have entered.
Format: filterC <tag>/KEYWORD
Supported tags: c/COMPANY NAME, p/PHONE, e/EMAIL, a/ADDRESS
Examples:
-
filterC n/HanBaoBao Pte Ltd a/Yishun MRT
(Returns all companies with the nameHanBaoBao Pte Ltdand address saved asYishun MRT)
4.5.3. Filters job offers from a selected company based on searched fields that you have entered.
Format: filterj <tag>/KEYWORD
Supported tags: c/COMPANY NAME, j/JOB OFFER, g/GENDER, s/SALARY, x/AGE, h/HIGHEST EDUCATION
Examples:
To look for job offers listed by KFC only, include the name of company in the searched field.
-
filterj c/KFC j/cashier
(Returns allcashierjob offers listed byKFC) -
filterj c/KFC s/1500
(Returns all job offers listed byKFCthat has pay higher than $1500(inclusive))
4.6. Editing a candidate / company / job : editc editC editj
4.6.1. Edits attributes of the candidate at the specified index INDEX
Format: editc <INDEX>
You can edit candidates with their specified INDEX.
The index must be an index number shown in the displayed candidates list.
Example:
-
editc 1 n/John Doe p/91234567
(Edits the name, phone number and email address of the candidate with index 1 to be John Doe and 91234567 respectively) -
editc 3 t/
(Edits and clears all existing tags belonging to the candidate at index 3)
4.6.2. Edits details of a company at the specified index INDEX
Format: editC <INDEX>
You can edit companies with their specified INDEX.
The index must be an index number shown in the displayed company list.
Example:
-
editC 1 c/KFC p/62226111
(Edits the name and phone number of the company with index 1 to be KFC and 62226111
4.6.3. Edits details of a job offer
Format: editj <INDEX>
You can edit job offers with their specified INDEX.
This index must be an index number shown in the displayed job list.
You need to enter listC first to see the full list of job offers! The <INDEX> is based on listC!
|
Examples:
-
listC -
editj 1 xr/20-30
(Edits theMIN_AGE-MAX_AGEattribute of the 1st job offer to be of 20 to 30 years of age)
4.7. Deleting candidates / companies / job offers : delete
4.7.1. Deleting candidate(s)
Format: deletec <INDEX>,<INDEX>-<INDEX> …
-
Deletes the candidate(s) with the specified
INDEX(s) -
You can use
<INDEX>-<INDEX>to specify a range of indexes. For example,1-3specifies the indexes 1, 2 and 3. -
This index must be an index number shown in the displayed candidate list.
Use the findc and filterc command to quickly search the candidates you want to delete!
|
Example to delete candidate(s):
Step 1. findc n/John
(Shows all saved candidates named John)
Step 2. deletec 1,2-3,8
(Deletes the 1st, 2nd, 3rd and 8th candidate on most recent candidate list)
4.7.2. Deleting company(s)
Format: deleteC <INDEX>,<INDEX>-<INDEX> …
-
Deletes the company(s) with the specified
INDEX(s) -
You can use
<INDEX>-<INDEX>to specify a range of indexes. For example,1-3specifies the indexes 1, 2 and 3. -
The index must be an index number shown in the displayed company list.
Use the findC and filterC command to quickly search the candidates you want to delete!
|
| Deleting a company will delete its respective job offers in the CompanyBook! |
Example to delete company(s):
Step 1. listC
(Shows all available companies)
Step 2. deleteC 1,6,2-3
(Deletes the 1st, 2nd, 3rd and 6th company in the most recent company list)
4.7.3. Deleting job offer(s)
Format: deletej <INDEX>,<INDEX>-<INDEX> …
-
Deletes the job(s) with the specified
INDEX(s) -
You can use
<INDEX>-<INDEX>to specify a range of indexes. For example,1-3specifies the indexes 1, 2 and 3. -
The index must be an index number shown in the displayed job list.
Use the findj and filterJ command to quickly search the candidates you want to delete!
|
Example to delete job(s):
Step 1. listj
(Shows all available jobs)
Step 2. deletej 5-4,6
(Deletes the 4th, 5th and 6th job in the most recent job list)
4.8. Deleting a shortlisted candidate: deleteShortlist
Deleting a shortlisted candidate is a 4-stage process. To exit from this process, enter cancel command as explained in [Exits from any intermediate command: cancel].
|
Format: deleteShortlist
-
Initialization
-
Type
deleteShortlistand press Enter to initialize the delete process.
-
-
Choose the company
-
Type
selectC<INDEX>and press Enter to select the company.You can use sortC,findCorfilterCcommand to easily locate the company before selecting it.
-
-
Choose the job offer
-
Type
selectj<INDEX>and press Enter to select the job offer.You can use sortjcommand to easily locate the job offer before selecting it.
-
-
Choose the candidate to delete from the list of shortlisted candidates
-
Type
delete<INDEX>and press Enter to select the shortlisted candidate to delete.
-
| Index must be an index number shown in the displayed list. Deleting a shortlisted candidate does not delete the candidate completely. It removes the candidate from the list of shortlisted candidates for that particular job offer. |
4.9. Listing details of candidates / companies / jobs: listc listC
4.9.1. Shows a list of all candidates
Format: listc
| If you are viewing the Company Book, this command will automatically bring you to the Candidate Book. |

4.9.2. Shows a list of all companies and all job offers
Format: listC
| If you are viewing the Candidate Book, this command will automatically bring you to the Company Book. |
4.9.3. Shows a list of job offers based on a selected company
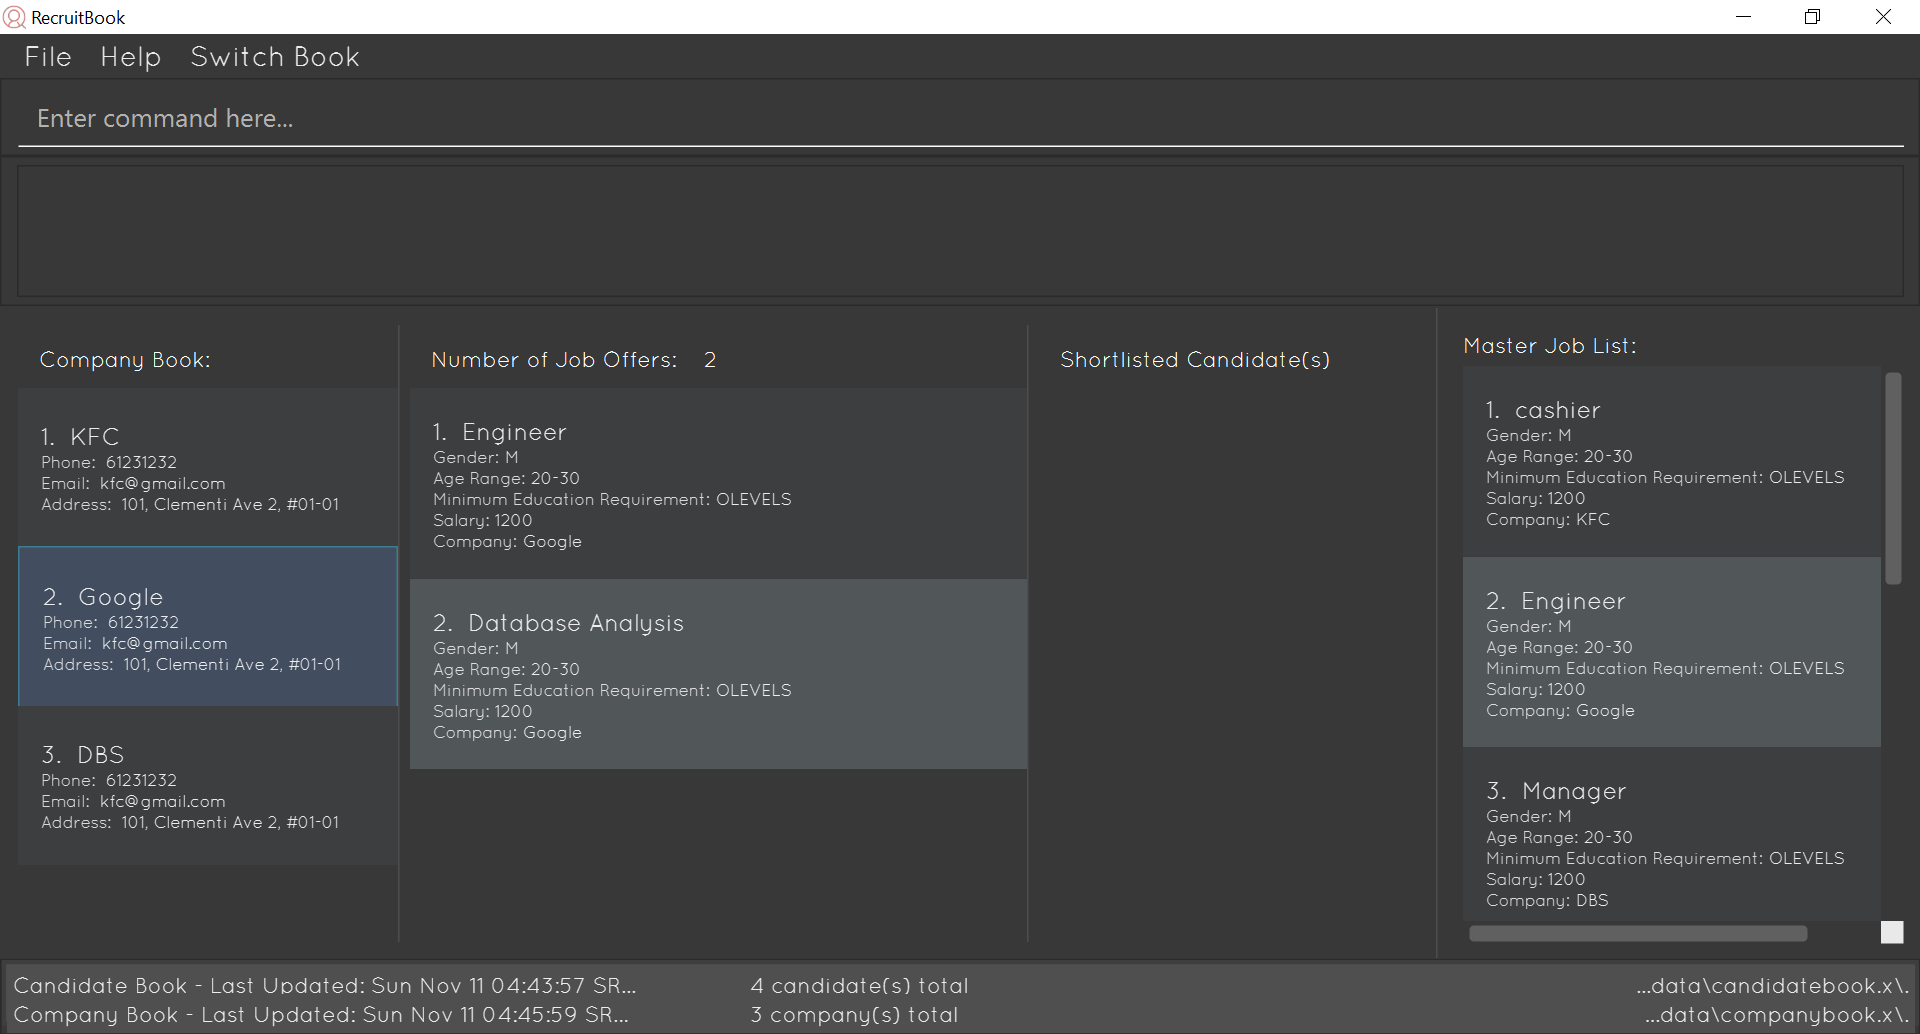
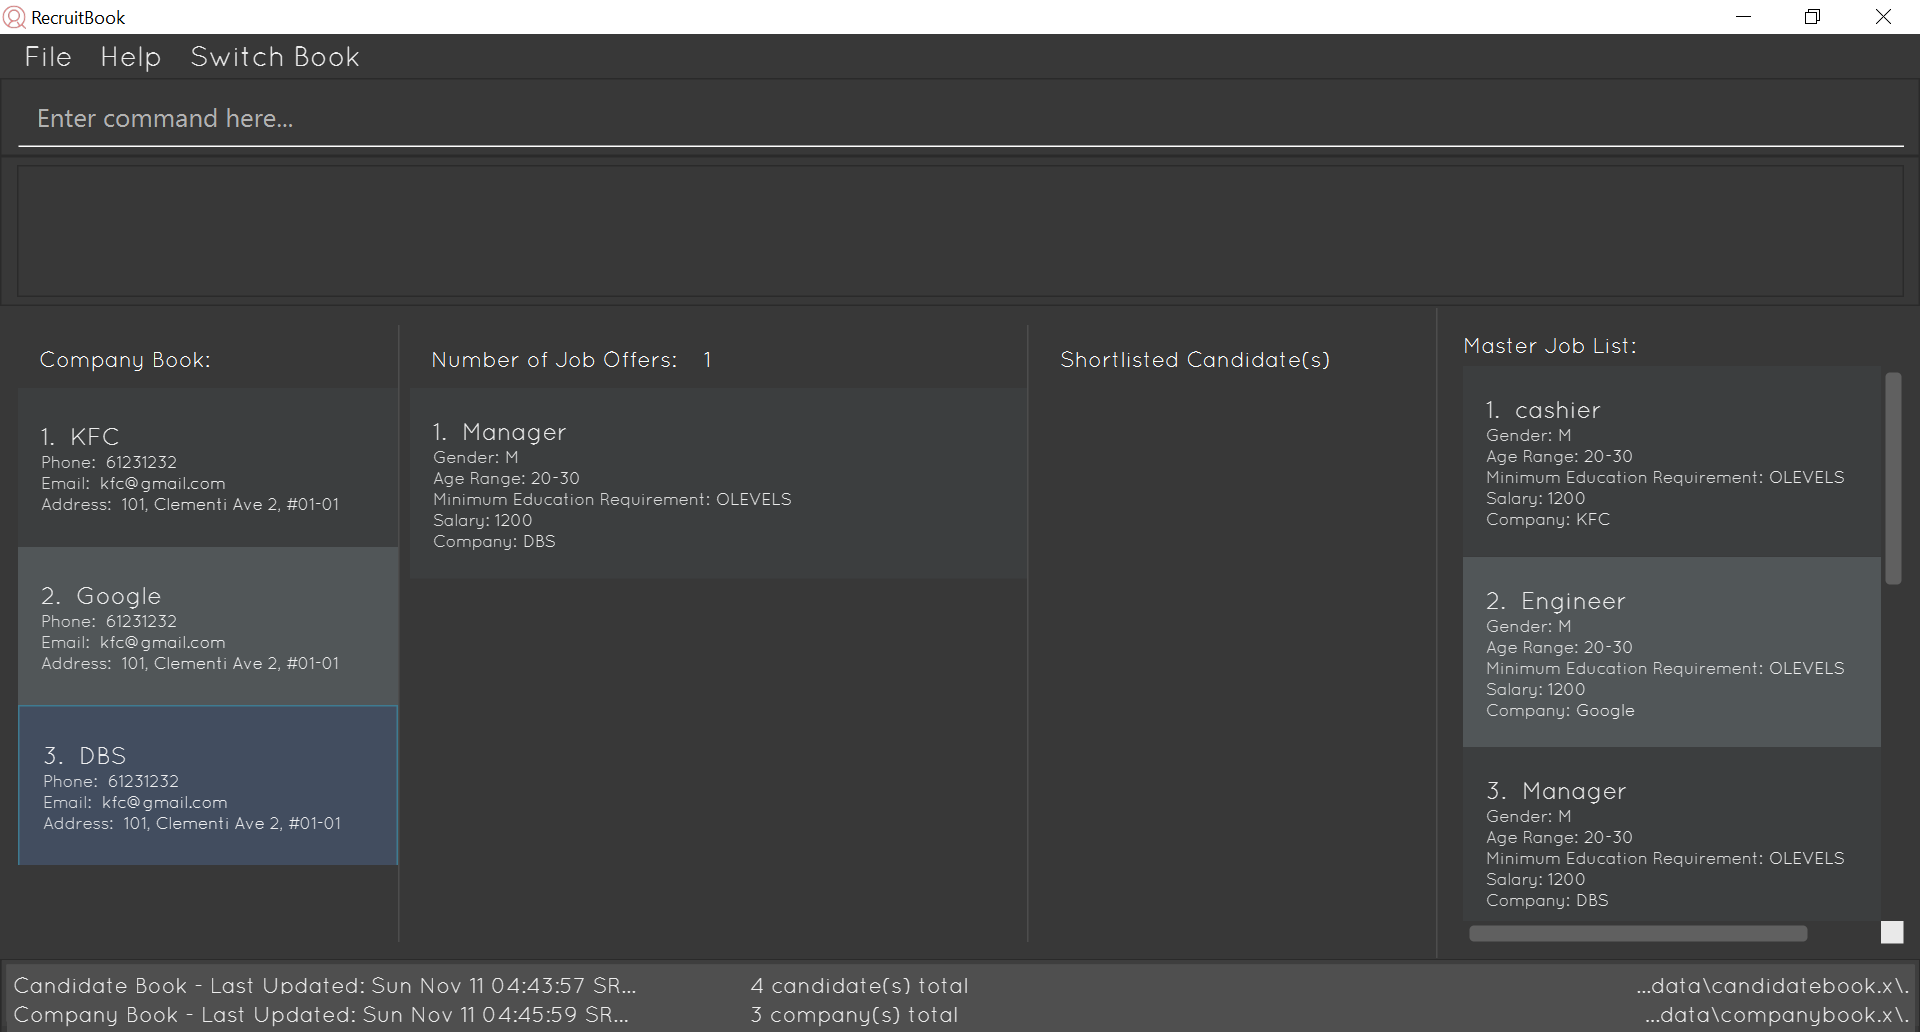
Company Book allows you to easily see the list of job offers based on the company you selected.
GUI (refer to examples shown on Figure 6, 7 and 8): Select a company on the left of the screen.

4.10. Selecting a candidate / company / job offer: selectc selectC selectj
4.10.1. Selecting a candidate :
Format: select <INDEX>
-
Selects the candidate with the specified INDEX
-
This index must be an index number shown in the displayed candidate list.
4.10.2. Selecting a company :
Format: selectC <INDEX>
-
Selects the company with the specified INDEX
-
This index must be an index number shown in the displayed company list.
4.10.3. Selecting a job offer :
Format: selectj <INDEX>
-
Selects the job offer with the specified INDEX
-
This index must be an index number shown in the displayed job offer list.
4.11. Sorting candidates / company / job : sortc sortC sortj
4.11.1. Sorting candidates based on different fields
Format: sortc <tag>
Supported tags: n/, x/, e/, j/, h/, s/, r/
-
Only one tag/field is included when using the sort command
-
You must have one tag/field included
Examples:
-
sortc n/
(Sorts all candidates lexicographically by their name) -
sortc r/
(Sorts all candidates in reverse)
4.11.2. Sorting companies based on different fields
Format: sortC <tag>
Supported tags: c/, e/, r/
-
Only one tag/field is included when using the sort command
-
You must have one tag/field included
Examples:
-
sortC c/
(Sorts all companies lexicographically by their company’s name) -
sortC r/
(Sort all companies in reverse)
4.11.3. Sorting job offers based on different fields
Format: sortj <tag>
Supported tags: c/, j/, xr/, h/, s/, r/
-
Only one tag/field is included when using the sort command
-
You must have one tag/field included
You should enter listC first to see the full list of job offers for sorting!
|
Examples:
-
listC -
sortj j/
(Sorts all job offers lexicographically by their titles) -
sortj r/
(Sorts all job offers in reverse)
4.12. Blacklisting candidates : blacklist blacklist rm
Format: blacklist <INDEX>
You can use this command to blacklist candidates with their specified INDEX.
The index must be an index number shown in the displayed candidates list
The candidates you blacklisted can no longer be edited or shortlisted.
Candidates can be unblacklisted by using blacklist rm.
|
Blacklisted Candidates have this tag:

Examples:
-
blacklist 1
(Blacklists first candidate in the list) -
blacklist rm 1
(Unblacklists first candidate in the list)
4.13. Shortlisting candidates for a job offer : shortlist
Shortlisting process is a 5-stage process. To exit from this process, enter cancel command as explained in [Exits from any intermediate command: cancel].
You cannot shortlist a blacklisted candidate or the same candidate who is already shortlisted for the same job offer.
|
Format: shortlist
-
Initialization
-
Type
shortlistand press Enter to initialize the shortlist process.
-
-
Choose the company
-
Type
selectC<INDEX>and press Enter to select the company.You can use sortC,findCorfilterCcommand to easily locate the company before selecting it.
-
-
Choose the job offer
-
Type
selectj<INDEX>and press Enter to select the job offer.You can use sortjcommand to easily locate the job offer before selecting it.
-
-
Choose the candidate
-
Type
selectc<INDEX>and press Enter to select the candidate to shortlist.You can use sortc,findcorfilterccommand to easily locate the candidate before selecting.
-
-
Confirm the details
-
Type
confirmand press Enter to confirm.
-
| Index must be an index number shown in the displayed list. |
4.14. Sending emails : email
Allows you to send an email to specified candidates about specified job offers OR
to specified companies about specified candidates that are suitable for specified job offers.
|
Only Gmail is supported at this point in time. If it is your first time running RecruitBook, a Gmail log in authorisation page will open on your browser. The Gmail account that you log in with will be the email account used to send emails. To use another Gmail account, delete tokens folder which is in the same directory of the
program.While the authorisation page is open, RecruitBook will be unresponsive while waiting for an authentication response. This also means that if RecruitBook never receives the authentication response, (by closing the authorisation page, or not having an internet connection), RecruitBook will remain to be unresponsive, and the only way out of this is by force closing it and reopening RecruitBook. This is part of Google’s API |
Format: email
Email process is a 4-stage process. To exit from this process, enter cancel command as explained in [Exits from any intermediate command: cancel].
|
-
Initialisation. Type
emailand press Enter to initialise the email command. -
Choose your recipients. On the RecruitBook application, what is shown on the main window will be taken in as recipients.
-
You can use
switchto switch between candidates and company view. -
You can also use commands such as
listc,filtercandfindcto change the candidates shown. -
You can also use commands such as
listC,findC,findj,filterCandfilterjto change the job offers or companies shown. -
Type
addto add the recipients. You will be informed of what has been added, and theaddcommand can be used as many times as you want. -
Once done, you can type
nextand press Enter to move on to the next step.
-
-
Choose your contents.
-
Depending on what what the recipients are, contents must be contrasting.
eg. If you picked candidates as the recipients, you can only pick contents to be job offers and vice versa. -
This is enforced by limiting commands available in contents selection.
eg. If you have picked candidates as the recipients, you are restricted tolistC,findC,findj,filterCandfilterj.switchis now disabled by default as well. -
Type
addto add the contents. You will be informed of what has been added, and theaddcommand can be used as many times as you want. -
Once done, you can type
nextand press Enter to move on to the next step.
-
-
Sending your email. This step is a confirmation step before you send the email.
-
You can type
previewand press Enter to preview your email. A window will pop up showing the contents of the email. -
Type
sendand press Enter to send the email. There might be a slight lag while RecruitBook is sending the email(s)! Do not be alarmed.
-
Other notes
-
You can type in
backto go back to the previous step should you forget to add a certain recipient or content. -
Adding duplicate candidate/job offers will be caught and will not be double counted.
-
If recipients are candidates, candidate email addresses are sent under the BCC field to protect the privacy of your candidates.
-
If recipients are companies, emails are sent individually to each company.
You can also change the default email subject and email body text in preference.json.
Restart RecruitBook for changes to take effect.
-
subjectCandidateAsRecipient→ Email subject if recipients of the email are candidates and contents of the email are job offers -
subjectCompanyAsRecipient→ Email subject if recipients of the email are companies and contents of the email are candidates. -
bodyTextCandidateAsRecipient→ Body text of email if recipients of the email are candidates and contents of the email are job offers -
bodyTextCompanyAsRecipient→ Body text of email if recipients of the email are companies and contents of the email are candidates.
Examples:
-
email
(Initialise email command) -
findc s/$1000
(On CandidateBook) -
next
(To select recipients) -
findj j/Cashier
(On CompanyBook) -
next
(To select contents) -
preview
(To preview email) -
send
(To send the email)
4.15. Setting a password : setPW
Format: setPW
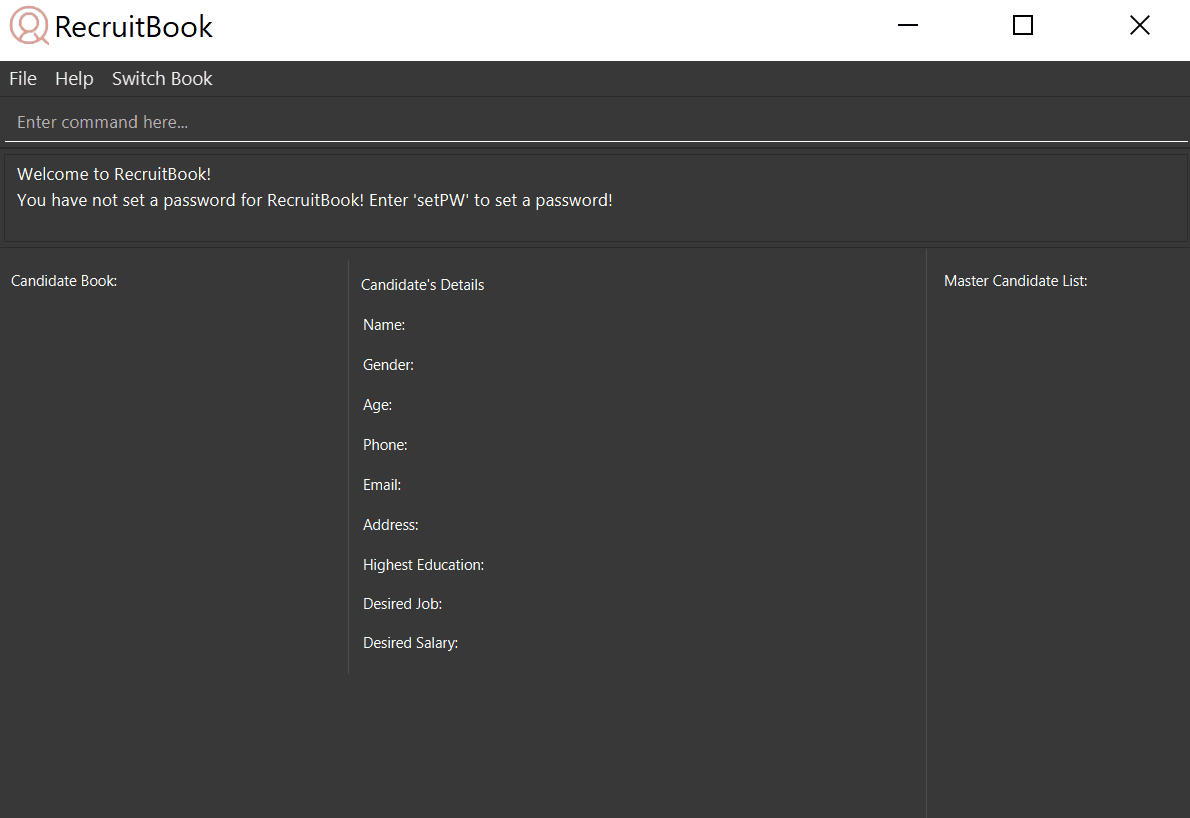
You might have seen the below welcome message on your very first login.
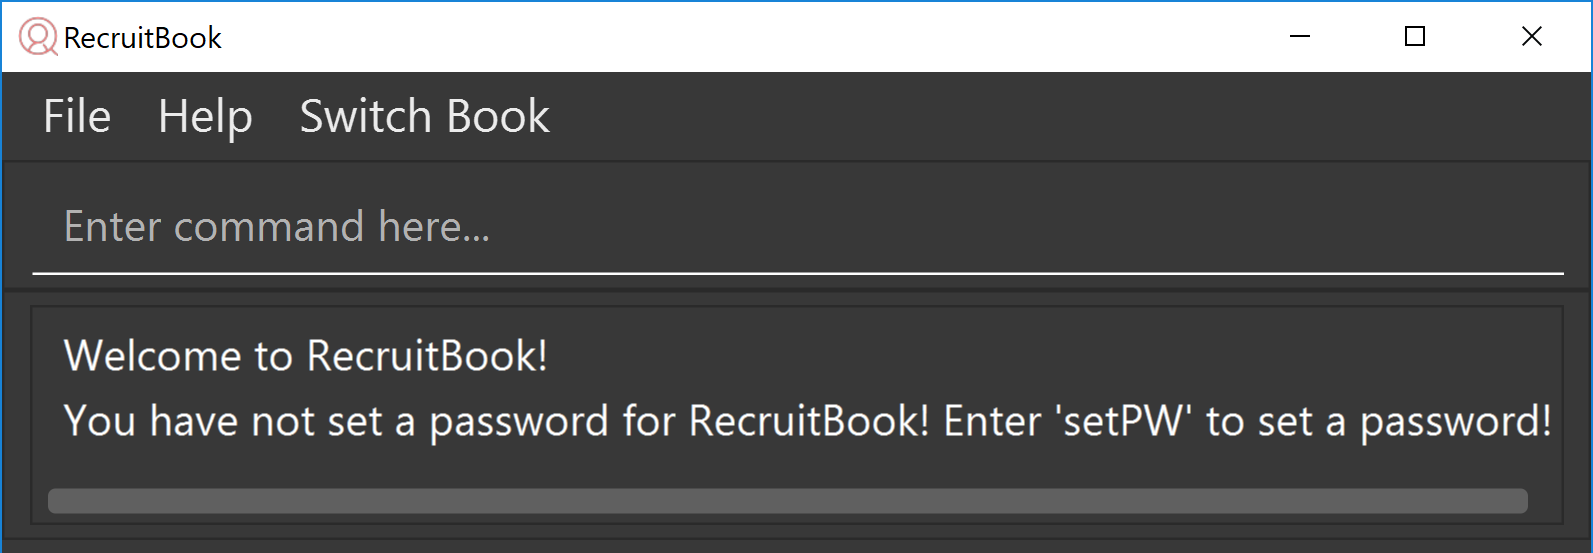
To help protect your data confidentiality and integrity, you can enter setPW to set/change your password!
After entering setPW you will be prompted the following:
|
Enter your new password, reenter your new password when prompted to confirm and you will have successfully set a new password! Now whenever you start RecruitBook, your new password is required to verify the user’s access to your data.
4.16. Undo/Redo changes to entries : undo redo
Undo the last change to RecruitBook
Format: undo
You can use undo the previous change to entries RecruitBook such as adding/deletion of candidates,
Example:
Step 1. deletec 1-9
(Delete candidates at specified indexes 1 to 9)
Step 2. undo
(Undo the previous change to RecruitBook, the deletion of candidates from Step 1. )
Redo the last undone change to RecruitBook
Format: redo
You can use redo to quickly redo the last undone step.
Step 1. deleteC 1-2
(Delete companies at specified indexes 1 and 2)
Step 2. undo
(Undo the previous change to RecruitBook, the deletion of companies from Step 1.)
Step 2. redo
(Redo the previous undone change to RecruitBook, the deletion of companies from Step 1.)
4.17. Clearing all entries : clearc clearC
Clears all entries from the Candidate Book.
Format: clearc
Clears all entries from the Company Book.
Format: clearC
4.18. Exiting from any intermediate command: cancel
Format : cancel
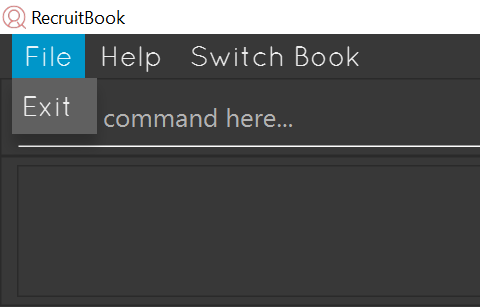
4.19. Exiting the program : exit
Exits the program.
-
Format in CLI :
exit -
GUI (refer to Figure 9) : At the top of the application, locate the menu bar and click
File>exit.
4.20. Saving the data
RecruitBook data are saved in the hard disk automatically after any command that changes the data.
There is no need to save manually.
4.21. Encrypting data files [coming in v2.0]
{explain how the user can enable/disable data encryption}
5. FAQ
Q: How do I transfer my data to another Computer?
A: Install the app in the other computer and overwrite the empty data file it creates with the file that contains the data of your previous RecruitBook folder.
6. Command Summary
Help |
|
Switch |
|
Adding Candidates |
|
Candidate Parameters |
|
Adding Companies |
|
Company Parameters |
|
Adding Job Offers |
|
Job Offer Parameters |
|
Edit |
e.g. |
Delete Candidates |
e.g. |
Delete Companies |
e.g. |
Delete Job Offers |
e.g. |
Delete Shortlisted Candidate |
|
List all Candidates |
|
List all Companies and all Job Offers |
|
Select Candidate |
|
Select Company |
|
Select Job Offer |
|
Find |
|
Filter |
e.g. |
Sort |
|
Blacklist |
|
Shortlist Candidate |
|
|
|
Cancel |
|
Clear CompanyBook |
|
Clear CandidateBook |
|
Undo CompanyBook |
|
Redo CandidateBook |
|
Exit |
|